 →
→ How to Build a Sourdough Starter from Scratch
This post may contain affiliate links. Please read my disclosure policy.
This post outlines how to build a sourdough starter from scratch simply and quickly. In less than a week, with minimal effort, you will have a bubbly, active starter on your hands to use in all your favorite sourdough recipes.
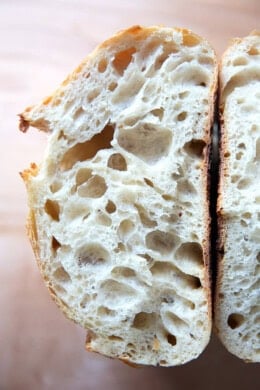
A sourdough starter is a fermented mixture of flour and water that contains wild yeast and bacteria. It both leavens and flavors sourdough bread.
How? It’s time for a science lesson.
Wild yeasts and bacteria exist everywhere, namely in flour, but also in the air and on your hands. When we mix flour and water and let it sit, wild yeasts begin searching for food, which they find in the flour: they convert the starch in the flour into sugar. As they digest this sugar, they produce two things: carbon dioxide, which makes the starter rise, and alcohol, which the wild bacteria drink up and in turn produce various types of lactic and acetic acids — these acids are what give the bread the sour flavor.
Cool, right? The wild yeasts and bacteria work symbiotically to both leaven and flavor our starter and ultimately our bread.
3 Tips For Success
Because wild yeast and bacteria are the backbone of a sourdough starter, it is crucial that these microbes are happy for your starter to thrive: the happier they are, the more they multiply, the more powerful the starter you create.
Building up a colony of happy microbes takes time and care. Here are three tips for success:
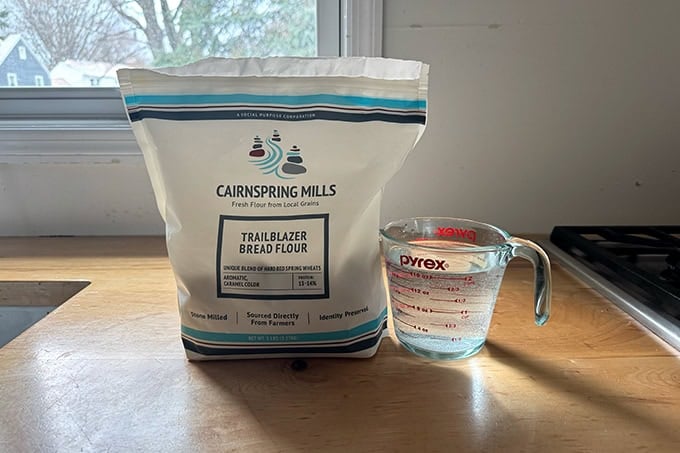
Tip #1: Use Good Flour: Use freshly milled, stone-milled flour because the added minerals and nutrients provide better food for the microbes (yeast and bacteria) to thrive. If you have a local source, use it! Health food markets, co-ops, and stores like Whole Foods often carry freshly milled flour. See recipe box for a few online sources I love. Stone-Milled Flour = Rocket Fuel For Your Starter
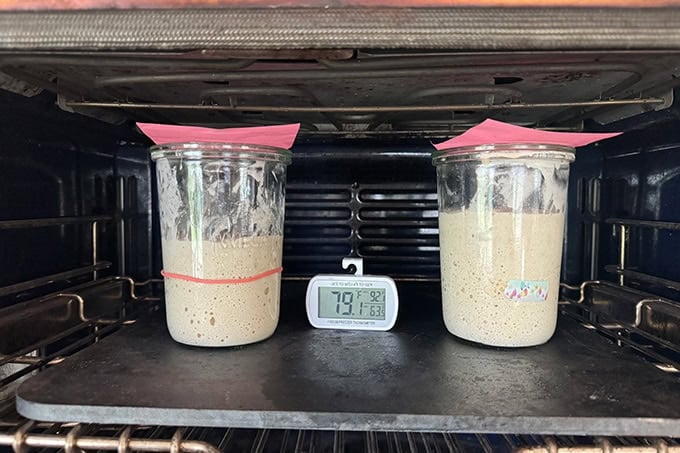
Tip #2: Keep Your Starter Cozy: Ideally, you’ll attempt this project while it’s hot outside — I find 80ºF (26ºC) to be ideal. If you’re building your starter when it’s cold outside, find a place to keep it warm. See recipe box for some ideas. Invest in a reasonably priced ambient temperature thermometer to help you monitor the various warm environments you create:
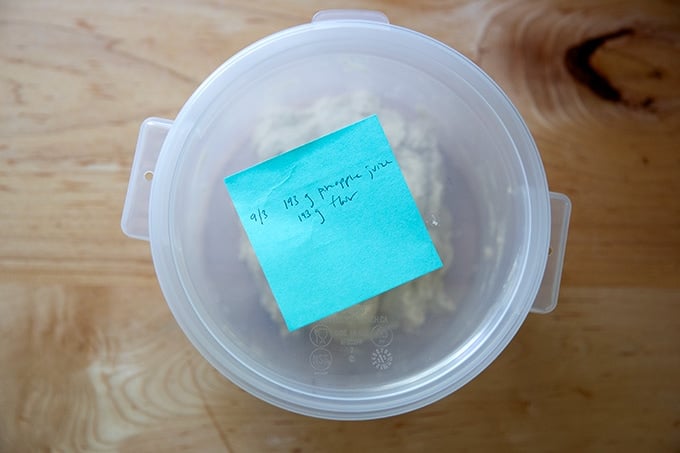
Tip #3: Use Pineapple Juice: Using pineapple juice in place of water initially can shorten the overall timeline for building a sourdough starter from scratch. This is because wild yeast cells prefer a somewhat acidic pH (which pineapple juice is) in which to grow.
How to Build a Sourdough Starter From Scratch, Step by Step
Day 1: Gather your materials: good stone-milled flour and water or…
… flour and pineapple juice:

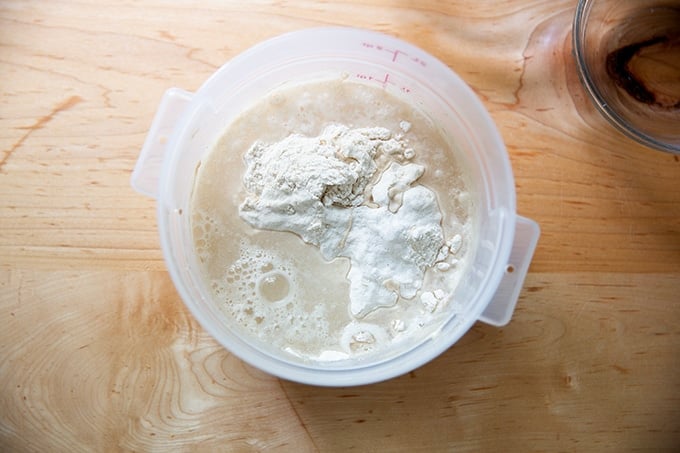
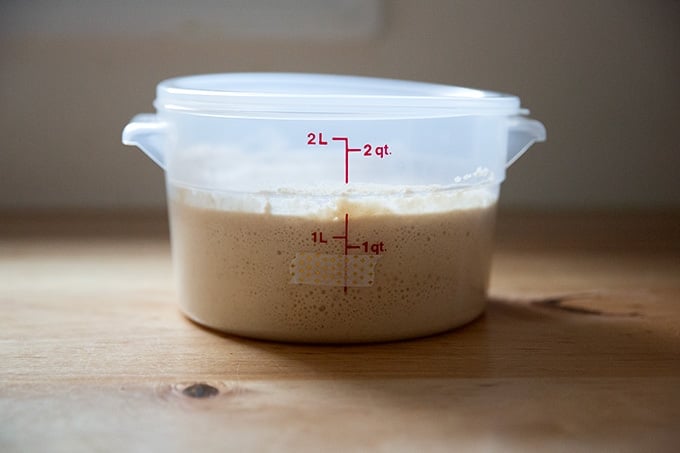
Pour the water or juice into a large bowl or, ideally, a straight-sided vessel on a tared scale.
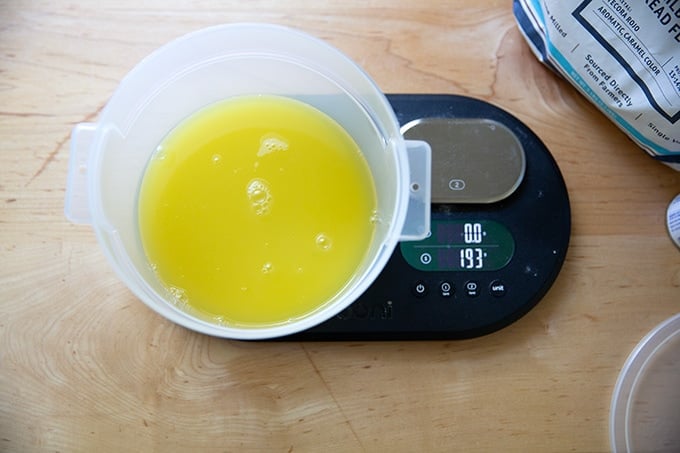
Add an equal amount of flour by weight. It should be about 192-193 grams of each.
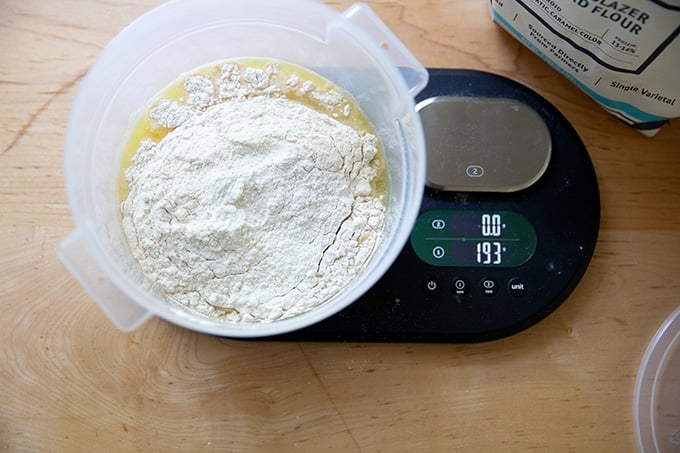
Stir until the flour is absorbed.
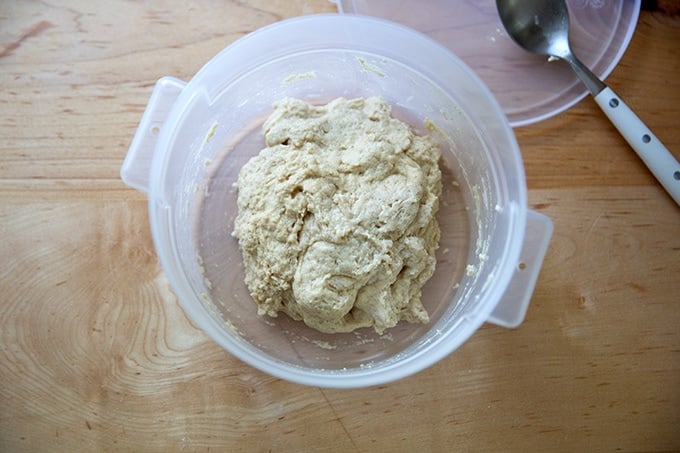
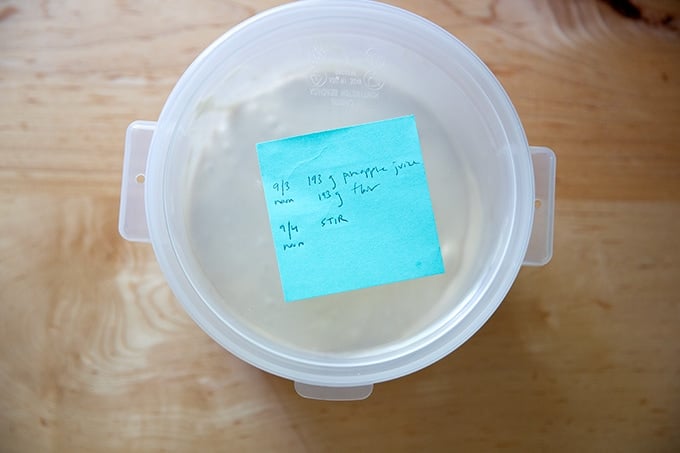
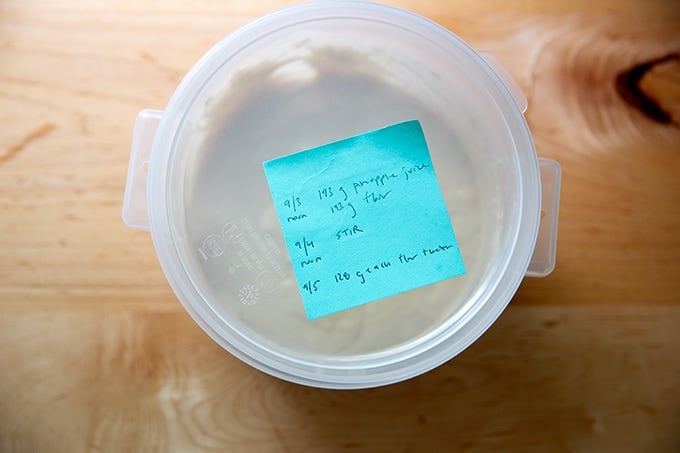
Cover the vessel. Record the date, time, and measurements — you will forget which day you started if you don’t. Let it sit at room temperature for 24 hours.
Day 2: Uncover the vessel and…
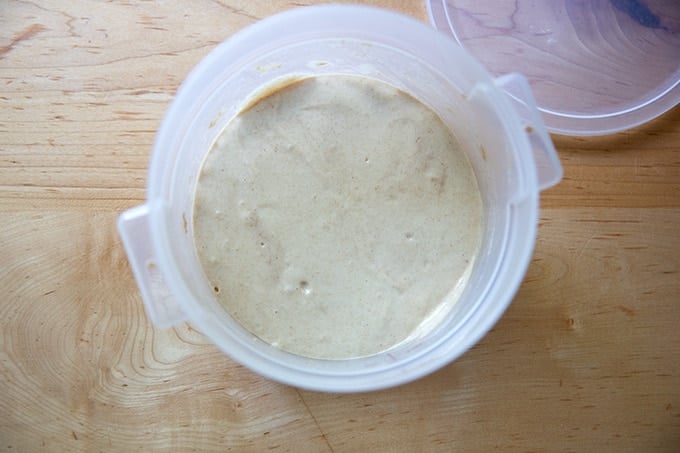
… give it a stir.
Re-cover the vessel, and record your work. Let it sit at room temperature for another 24 hours.
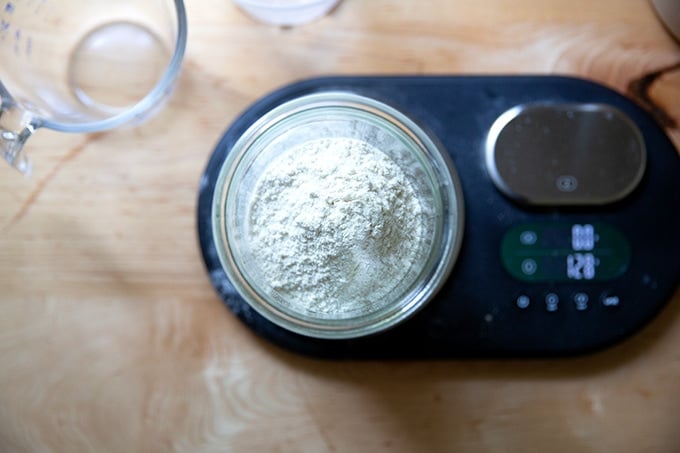
Day 3: Uncover the vessel.
Measure out 128 grams (about 1 cup) of flour and 128 grams (about 1/2 cup) of water:
Add them to the vessel.
Stir to combine.
Cover the vessel and record your work again. Let it sit at room temperature for 24 hours, stirring once or twice.
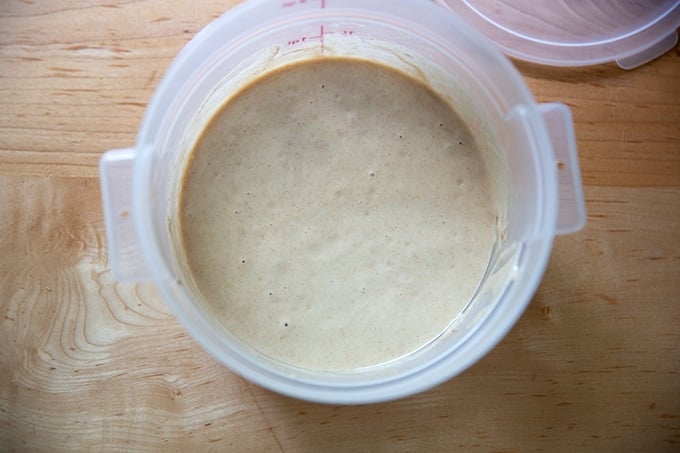
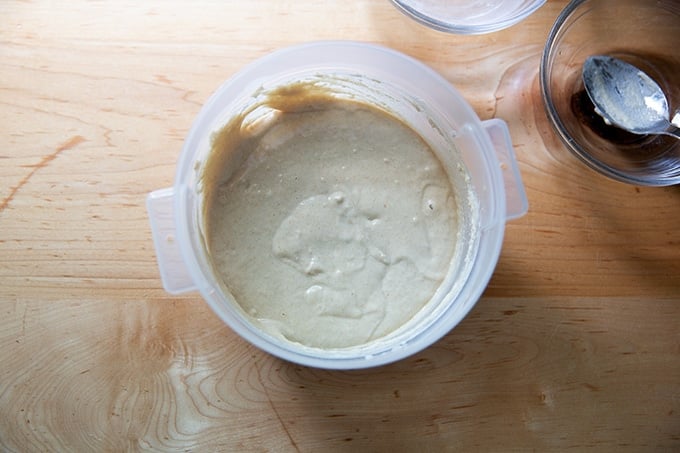
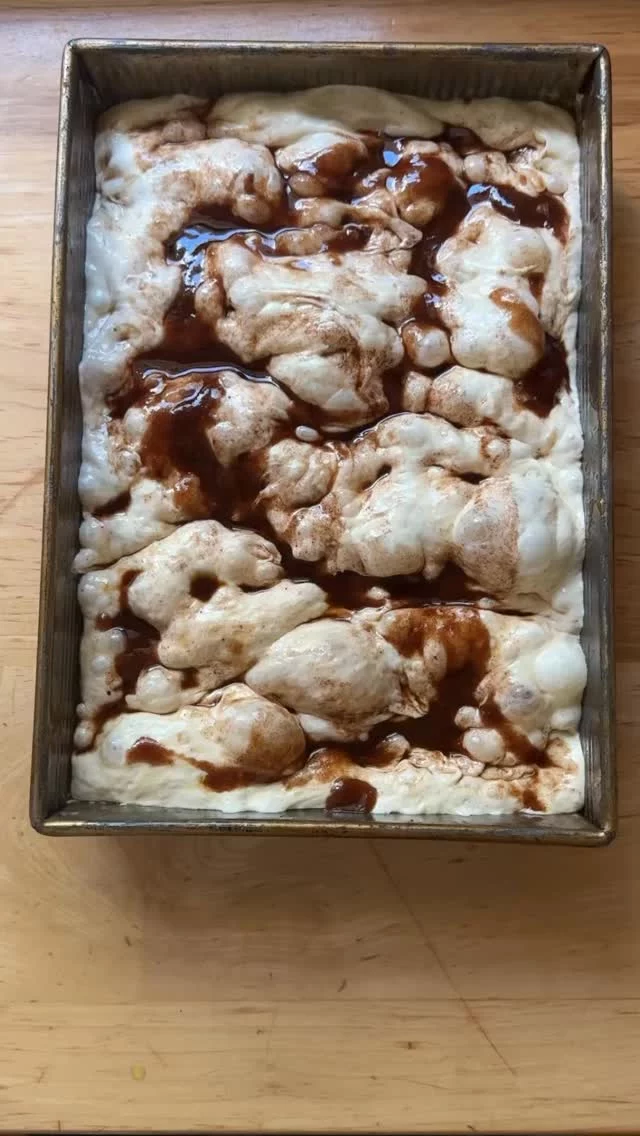
Day 4: Uncover the vessel. You should see a little action (bubbles). Measure out 128 grams (about 1 cup) of flour and 128 grams (about 1/2 cup) of water:
Add them to the container.
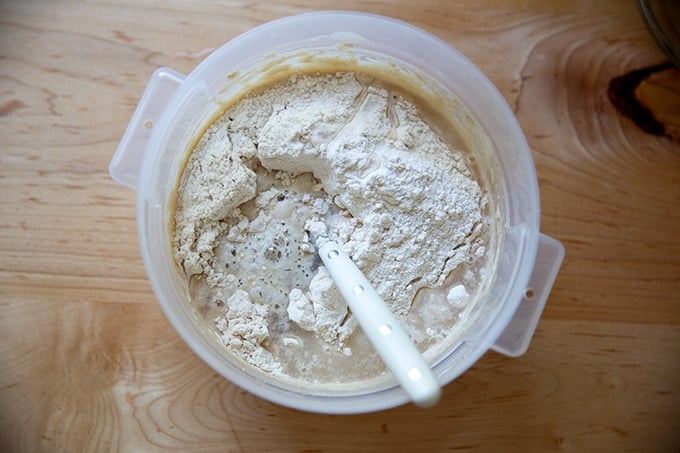
Stir to combine.
On this day, record your work again, and mark the height of your mixture with tape on the side of your vessel. Let it sit at room temperature for 24 hours, keeping a closer watch this time around.
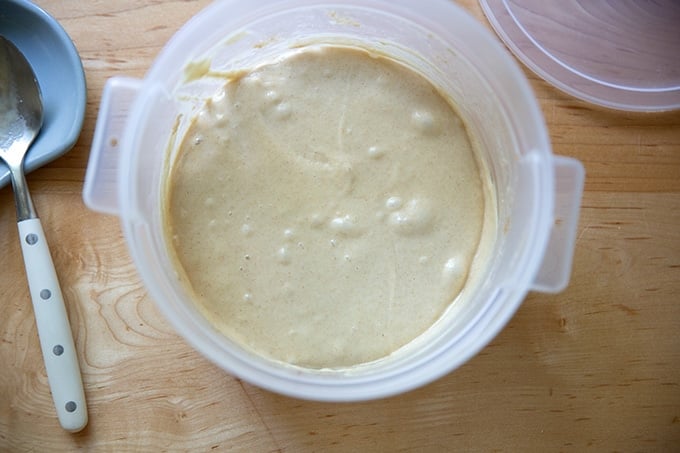
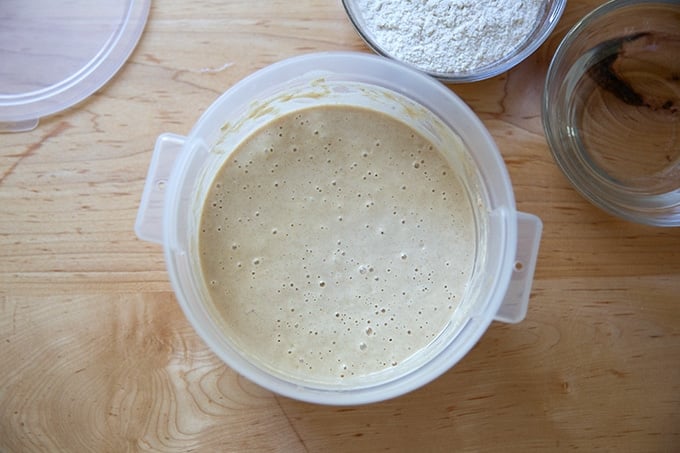
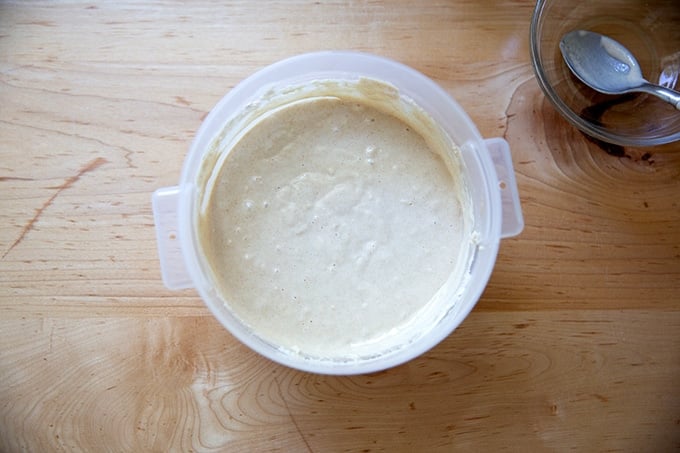
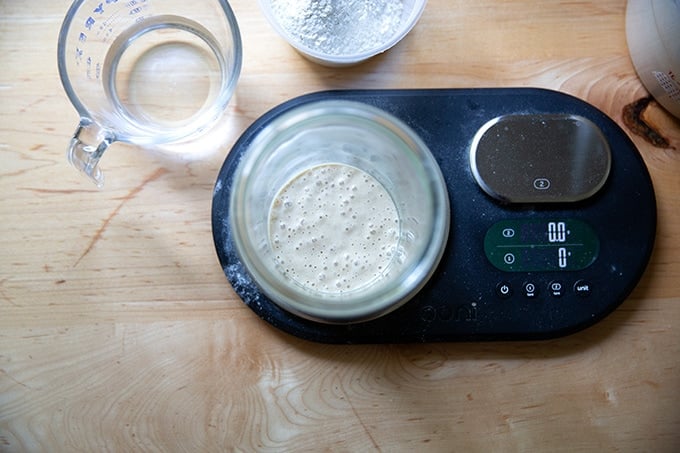
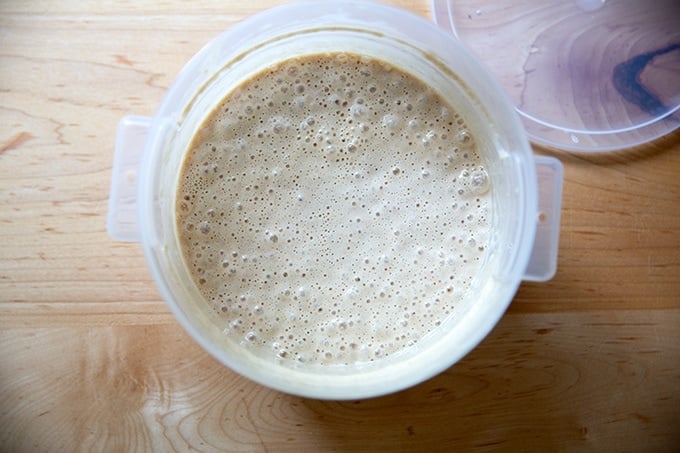
You will likely see some action…
The mixture might even double in volume.
And you should see lots of bubbles on the surface.
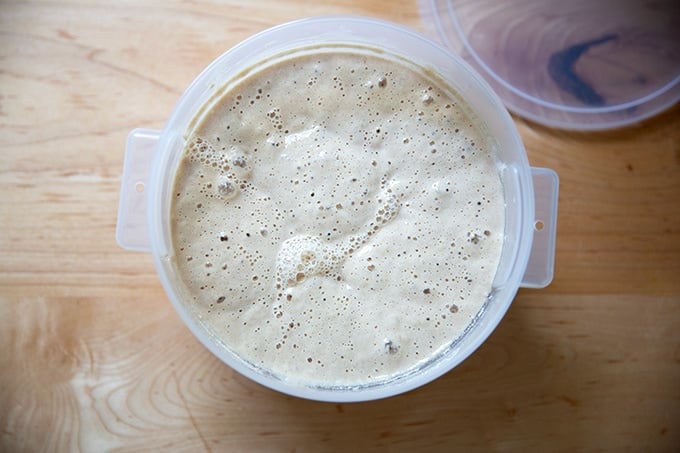
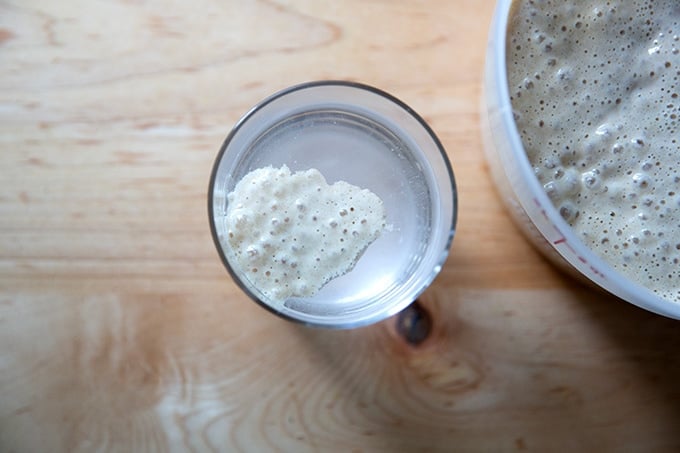
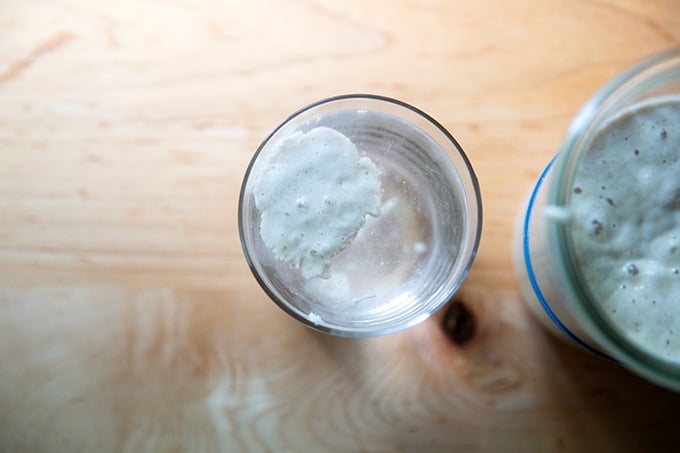
If your mixture is in fact rising, let it rise until it nearly doubles in volume; then drop a spoonful of it in water. If it floats, you’re in business. Note: Your starter might rise (and maybe fall) while you are sleeping — don’t worry if you don’t “catch” it at its peak. Continue on with the process that follows.
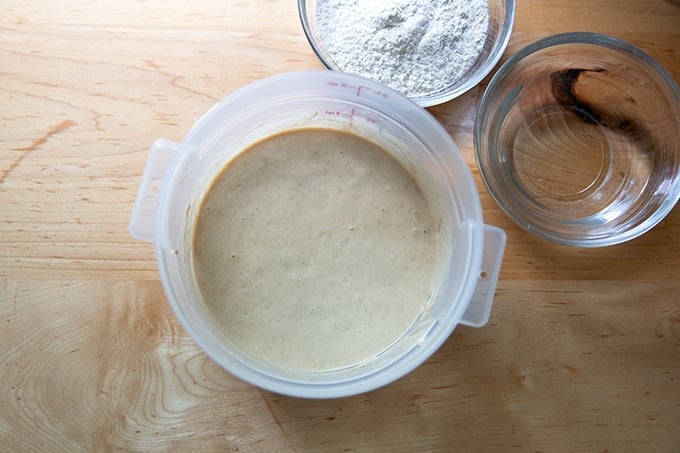
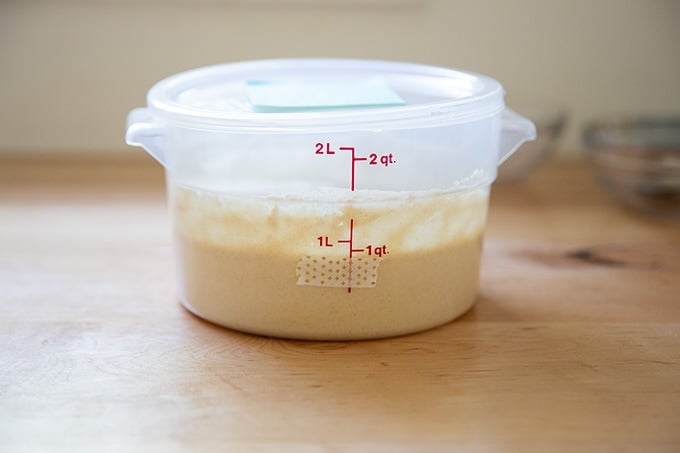
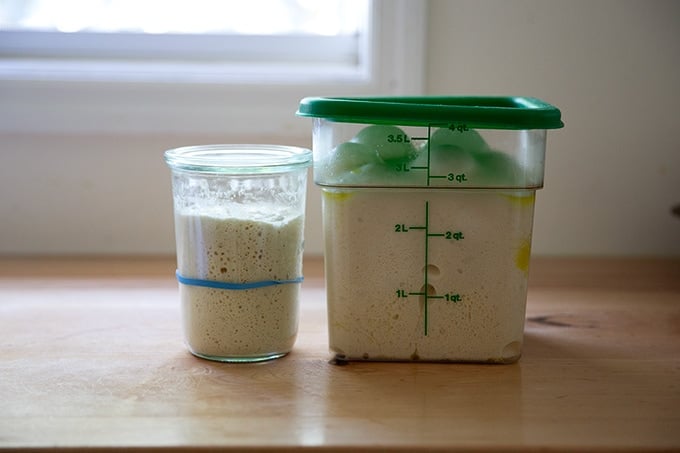
Spoon 128 grams of the starter into a new vessel.
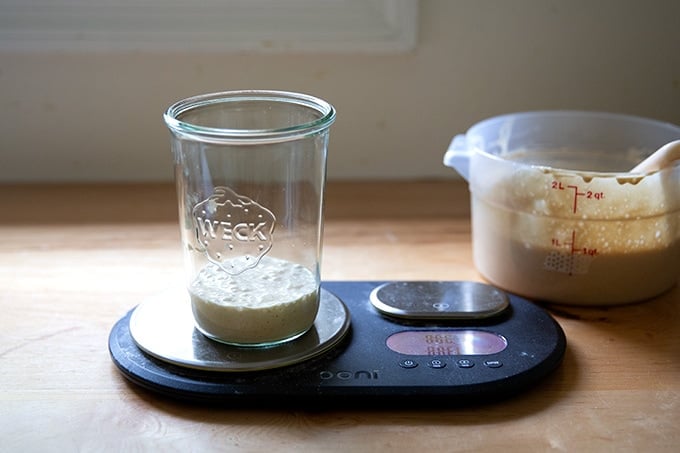
Measure another 128 grams of flour and water each.
Add the flour and water to the starter.
Stir to combine.
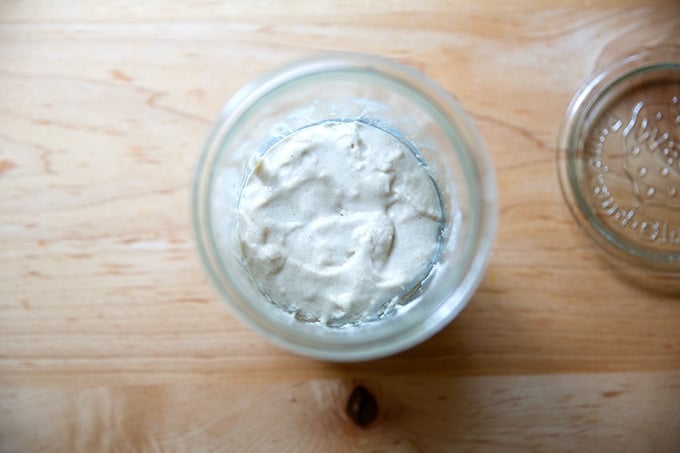
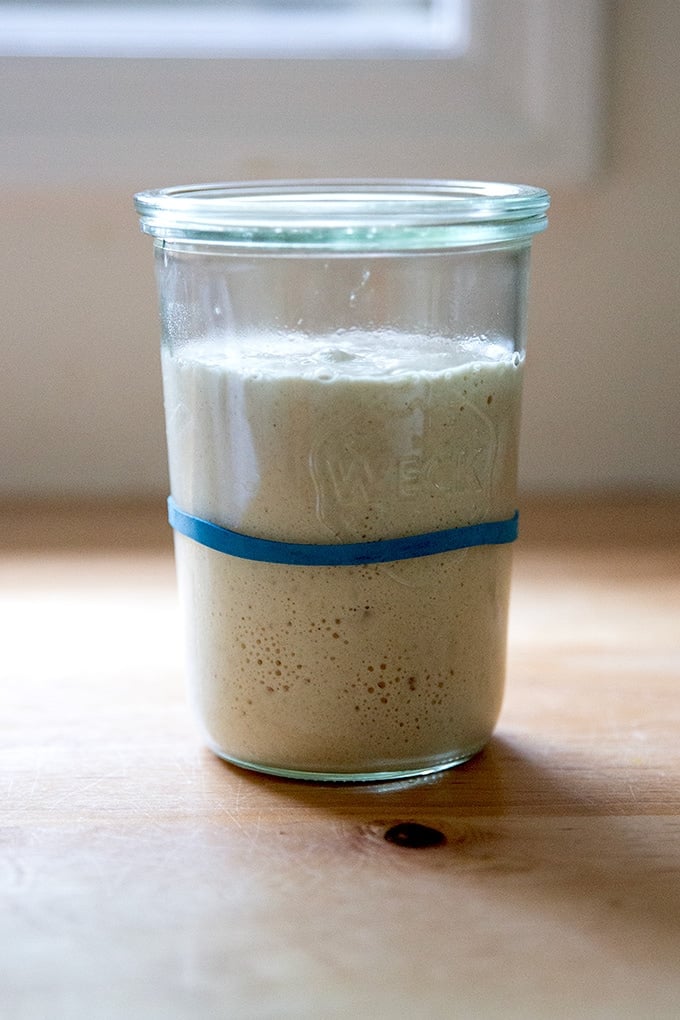
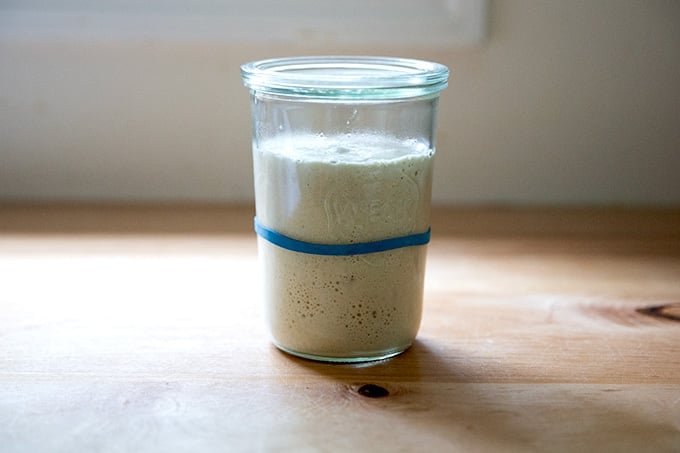
Mark the height with a rubber band.
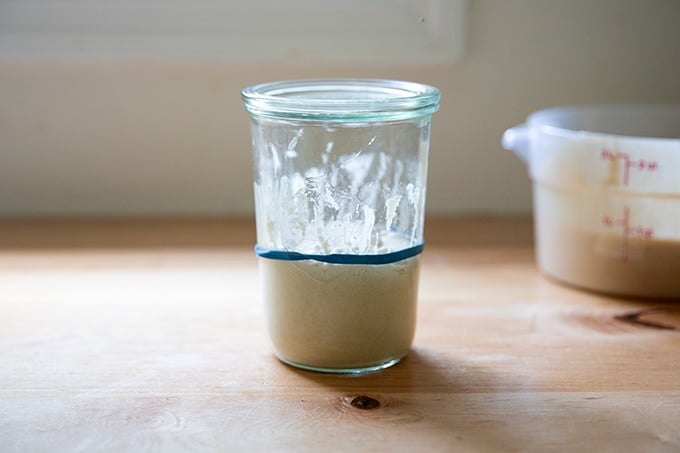
This original vat of sourdough starter is now your discard bucket. Transfer it to the fridge or use it in one of your favorite sourdough discard recipes: tortillas, crackers, pancakes, soda bread.
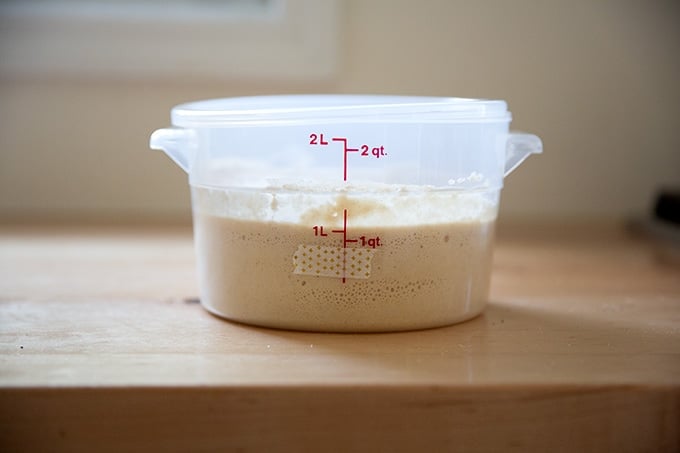
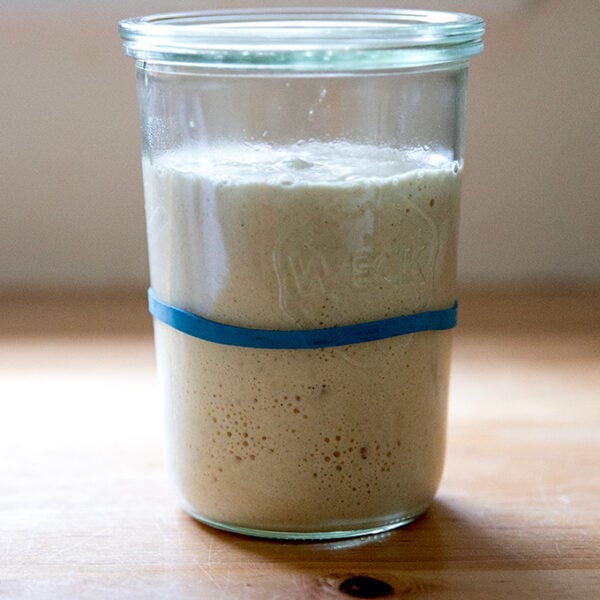
Day 5: When your starter doubles…
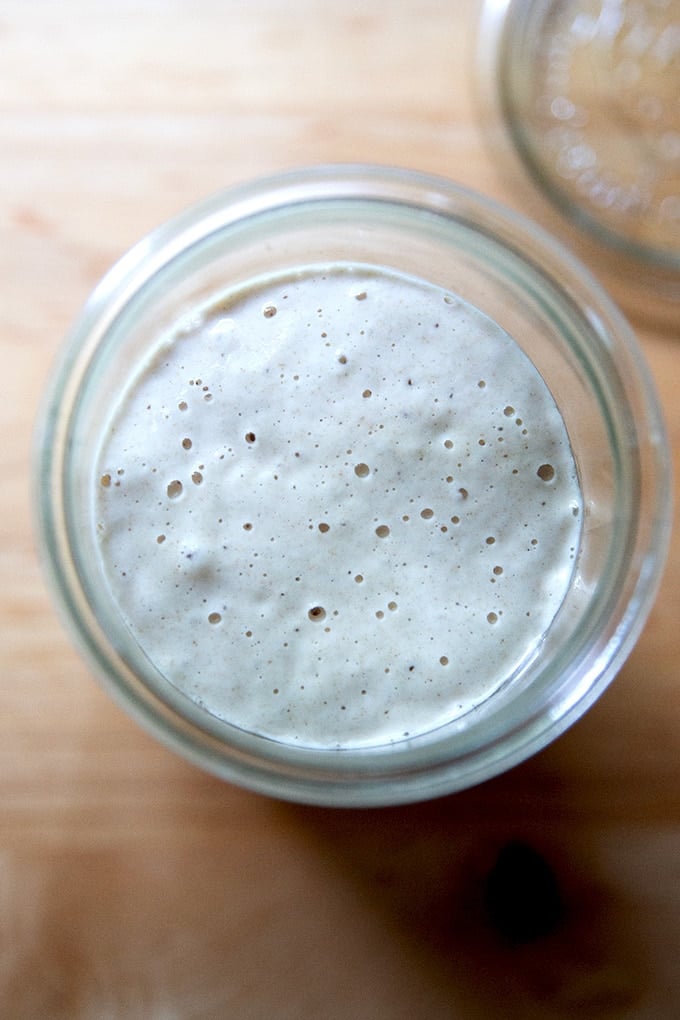
… and floats…
…you can do one of three things:
- Repeat this process: spoon 128 grams of starter into a new vessel and add 128 grams each flour and water. (Transfer the remaining starter to your bucket of discard.) Let the new starter rise until it doubles. Your starter will get stronger with every feeding.
- Transfer it to the fridge if you need to take a break from the process. You can pick up where you let off when you are ready.
- Test it out…
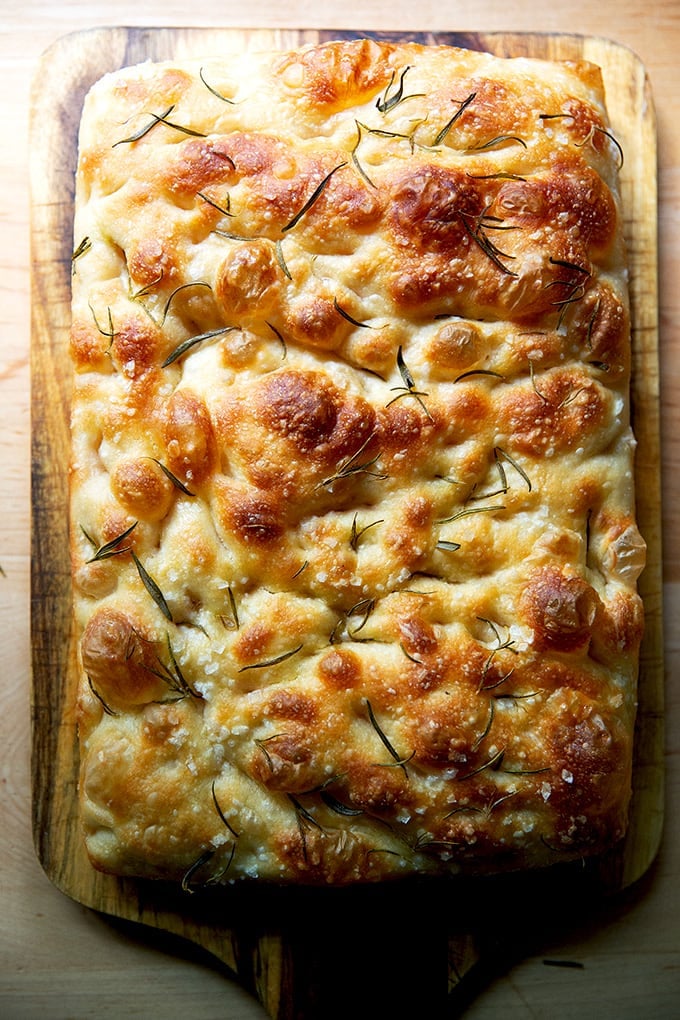
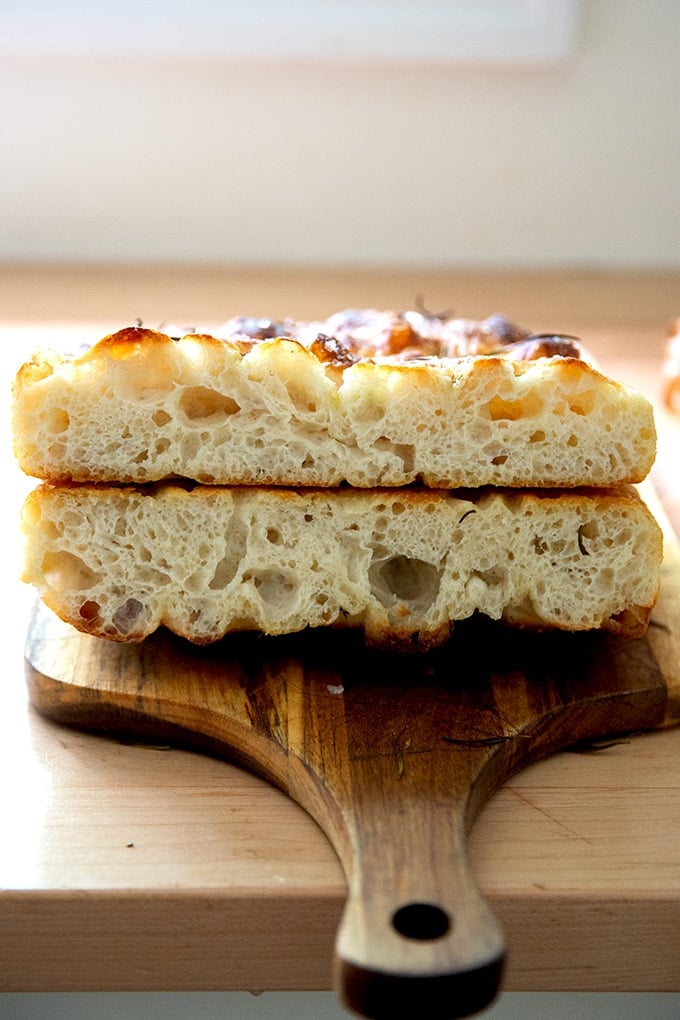
… in a sourdough bread recipe. I recommend starting with…
… focaccia, one of the easiest breads to make.
How to Build a Sourdough Starter from Scratch
- Total Time: 5 days
- Yield: 3 cups 1x
Description
This post outlines how to build a sourdough starter from scratch simply and quickly. In less than a week, with minimal effort, you will have a bubbly, active starter on your hands to use in all your favorite sourdough recipes.
Notes:
Adapted from Peter Reinhart’s method, outlined in Perfect Pan Pizza (and many of his other books as well).
If you are looking for guidance on how to feed, maintain, and store your already strong starter, see this post: How to Feed, Maintain, and Store a Sourdough Starter.
5 Tips for Success
- Use a scale to measure. It is the only way to measure accurately.
- Use a straight-sided vessel, which will help you more accurately see how much your starter is growing.
- Attempt this project while it’s hot outside or create a cozy place for your starter to rise: Ideally, the cozy place you create will be between 70ºF (21ºC) and 80ºF (26ºC).
- Find a warm place in your kitchen (like on top of your refrigerator) to let it rest.
- Invest in the Brod and Taylor Sourdough Home: I do not own this, but it gets good reviews, should you have the space for it.
- Use your Instant Pot! One of you suggested the following: Press the Yogurt button once; use the “Temp/Pressure” button to set the temperature to Low. Change the time to however many hours you need.
- Use a Heating Pad: One of you ingeniously made a homemade proofing box by placing a seed heating pad in a box and covering it with a towel.
- Try the warm oven trick: turn your oven on for 1 minute (at any temperature) and then turn it off. Consider sticking a post-it note to the oven to remind you that you have a starter in there so that you don’t accidentally preheat your oven and kill your starter.
- Another idea: Turn the oven light on for 10 to 15 minutes, then shut it off. I caution against keeping the oven light on the entire time because it potentially will create a too-warm space (especially in a newer oven) that might kill your starter. A great tool to invest in is an ambient temperature thermometer, as it will help you accurately gauge the temperature of the cozy spaces you create to help your starter thrive
- Use freshly milled stone-milled flour. If you have a source local to you, use it! Health food markets, co-ops, or markets such as Whole Foods often carry freshly milled flour. Here are a few mail-order options:
- Water: If your water is RO or if you have concerns about your water, you can:
-
- Use water that you’ve left out overnight to ensure any chlorine has evaporated.
- Buy spring water. In some places, letting water sit out overnight will not be effective, and your tap water may kill your starter.
Discard: At the end of the first four days of the process, you’ll be left with a decent amount of sourdough discard, which you can use in countless recipes. Here is my collection of Sourdough Discard Recipes.
Ingredients
- 192 grams (about 1 1/2 cups) stone-milled flour, see notes above
- 192 grams (about 3/4 cups) water or pineapple juice, see notes above
Instructions
- Day 1: Ideally, you are using a straight-sided vessel for this project; otherwise, a large bowl is fine. (Note: A straight-sided vessel allows you to truly see how much your starter is growing. I’m using this Cambro.) Stir together the flour and water (or juice) until the flour is absorbed. Cover the vessel. Record the date, time, and measurements — you will forget which day you started if you don’t. Let it sit in a cozy environment — 75ºF to 80ºF is ideal (see ideas above) — for 24 hours. If you remember, stir the starter once or twice over these 24 hours.
- Day 2: Uncover the vessel. Stir the mixture. Re-cover the vessel, and record your work. Let it sit in a cozy environment for another 24 hours. If you remember, stir the starter once or twice over these 24 hours.
- Day 3: Uncover the vessel. Add 128 grams (1 cup) of flour and 128 grams (about 1/2 cup) of water. Stir to combine. Cover the vessel, mark the height of your mixture with tape, and record your work again. Place it in a cozy spot. If possible, monitor your starter over the next 8 to 10 hours and if…
- …your starter doubles or begins to double, feed it with 128 grams each flour and water. If it doubles again before it’s time for you to go to bed, skip to Day 5 and proceed with making the offshoot. If it doesn’t, let it in a cozy environment overnight. Then proceed with making the offshoot (step 5) in the morning.
- … you are not seeing much action, continue to let it sit in a cozy environment till the following day, stirring it once or twice. Proceed with Day 4 in the morning.
- Day 4: Uncover the vessel. You should see some action (bubbles), and your starter should smell pleasant, not unlike a fruity yogurt. Stir it, then feed it with 128 grams each flour and water. Stir to combine. Cover the vessel, mark the height of your mixture with tape, and record your work again. Place it in a cozy spot. If possible, monitor your starter over the next 8 to 10 hours and if…
- …your starter doubles or begins to double, drop a spoonful of it in water. If it floats, you’re in business. Skip to Day 5 and proceed with making the offshoot.
- … your starter is not quite doubling, continue to let it sit in a cozy environment till the following day, stirring it once or twice. Proceed with Day 5 in the morning.
- Day 5: At this point, you should be observing some activity in your starter, meaning the starter should have risen slightly (perhaps doubled but perhaps not) and fallen with bubbles transforming from big to small. You’ll now take a small portion of this mixture and build a new starter: Transfer 100 grams of the starter to a new jar or vessel, and add 100 grams of flour and 100 grams of water. Stir well to combine, then cover the jar. Mark the height with a rubber band. Let it sit in a cozy spot. Transfer the remaining starter to the fridge — this original mixture is now your sourdough discard and can be used in all sorts of recipes, see notes above. When your new starter doubles in volume, you can do one of three things:
- Repeat this process: spoon 100 grams of starter into a new vessel and add 100 grams each of flour and water. (Transfer the remaining starter to your bucket of discard.) Let the new starter rise in a cozy spot until it doubles. Your starter will get stronger with every feeding.
- Transfer it to the fridge if you need to take a break from the process. You can pick up where you left off when you are ready.
- Test it out in a sourdough bread recipe.
- Maintaining your starter: Once you have a strong, active starter on your hands, follow the steps in this post: How to Feed, Store, and Maintain a Sourdough Starter.
- Category: Bread
- Method: Stir
- Cuisine: American
This post may contain affiliate links. Please read my disclosure policy.


577 Comments on “How to Build a Sourdough Starter from Scratch”
Hi! I’m on day 8 my starter had been successfully doubling, and yesterday even passed the float test. But I wanted to see it again to get it stronger as suggested, but yesterday after discarding most of it, adding my 100g of water and flour each as I have been doing it hasn’t risen at all. I’ve been keeping it at a fairly consistent temperate the whole time. I have no idea what happened?! 😢 is I discard too much? Thanks in advance
Hi Megan! You are doing the right thing: discarding most of it and feeding it fresh flour and water is the right thing to do at this phase of your starter’s progress. You should be doing this 2x a day now.
Know that it is OK that your starter had been doing “well” and somehow now appears to not be doing so well… some people call it a starter “fake out”. It is common for a starter to go gangbusters in the beginning due to the rush of activity as the wild yeasts and bacteria feed like crazy on all of the “food” (the flour/water). As your starter matures/ripens, it becomes more acidic, and some of these microbes can’t survive… as they die off, the starter looks inactive, but it just needs time: more consistent feedings with fresh food and water and a warm place to rise.
Just keep at it with the feedings… it becomes a tedious process and, again, may take as long as 2 weeks to double consistently.
Hi, I started with pineapple juice instead of water. Tomorrow is day 3 for me. When I add more flour and water, should I use pineapple juice at this step as well? or do you only recommend that on day 1?
Hi! The pineapple juice is just for day 1.
Hi Ali, I am on day 4 of the challenge but I had to make a modification. I am using a warmer that only fit a 1-quart weck jar, so I started the challenge in a 1 quart jar (as opposed to the larger plastic container you show in this post/your videos). Because it’s a smaller vessel, I had to make some modifications and I skipped the second feeding before transferring to a new vessel. Here’s what I did:
– Day 1: 193g pineapple juice + 193 g flour
– Day 2: stir
– Day 3: add 100g each water & flour
– Day 4 (today): transferred 128g of the starter to a new jar, + 128g each water & flour
Before I transferred it to the new vessel, I saw lots of bubbles and it was a thinner batter-like consistency, but I don’t think it rose at all. It’s now been about 10 hours since I completed the last step (transferring to a new jar and adding 128g each of water & flour). I’m seeing bubbles again but it has not risen above my rubber band at all yet.
Did I ruin it by skipping the second feeding before transferring to the new vessel? At this point, should I do a second feeding today per your videos or should I wait until I see it rise 25-50%?
Any guidance is greatly appreciated! Thank you!
Hi Amy. No, you did not ruin it… you potentially missed an opportunity to feed a flury of microbes more food and therefore produce a larger pool of happy microbes to then create an offshoot from, but just know that there is no right way to do this. Also, this time of year, patience is the name of the game… it may take 2 weeks to get your starter to a place where it doubles in volume consistently.
At this point, I do think twice-a-day feedings, roughly 10-12 hours apart (if your schedule allows) will help produce a strong starter. Keep in mind if you miss a feeding, it’s no big deal… again there is no correct way to do this. If you skip a feeding, just pick up with the same process: discard most of it, feed it with equal parts flour and water by weight.
Thank you so much for your response! I have a question for the future – when I’m finally ready to use my starter and feed/store what’s left in the fridge, I am likely going to be storing it in a weck jar. Should I seal the jar with either the rubber seal or the metal clips while it’s in the fridge? Or should I just set the glass lid on top?
My pleasure 🙂
I would not use the clips. The rubber gasket might help provide a little more of a seal, so I would use that.
Hi there – I’m on Day 7, have followed the steps to a T, and all is going well except yesterday, my spoonful sunk to the bottom of the glass of water immediately. So quickly my heart went with it :(. My home is at an elevation of about 5500 ft, so I wonder if that has something to do with this.
Hi Rebecca! Apologies for the delay here. When you dropped the spoonful of starter into the water, did you spoon from the top of the risen starter? Or did you stir it together first, then spoon and test in the water? I don’t think elevation is affecting the process, but cold temperatures can. Is your kitchen on the cool side? Had you noticed your starter doubling in volume yet? Or had it only risen slightly?
Do keep in mind it can take as long as 2 weeks to develop a thriving starter that will reliably double in volume within 6-8 hours of a feeding.
Hello! I’m on day 7 and we have not doubled yet. It’s been growing about an inch by morning the past few days. I just switched containers as the other one was hard to stir so I put it in more of a bowl this time. I live in central Canada which can get -30 Celsius regularly. I’ve been leaving it on my counter with a dish towel overtop to hopefully keep in some of the warmth. I’m going to try the oven trick today but I don’t know if I’m able to keep up with that daily. Any other tips or just to keep at it, feeding it twice a day (morning and night, about 12 ish hours apart?). Thanks!
Hi Carmelle! Growing an inch each morning at this phase is really good, especially in these cooler months. Apart from the warm oven trick and feeding 2x a day, there isn’t much you can do. Other commenters have gotten creative using heating pads or making a homemade proofing box by placing a seed heating pad in a box and covering it with a towel.
Hi Ali,
Am about to start my first batch of starter – however my daughter has an allergy to pineapple. Is there another thing I can use? I’ve heard of people using grapes or grape juice, but I’m not sure it has the same anti-bacterial properties. I know I could use plain water – but tbh I’m a little afraid of sourdough fearing that if it doesn’t whine, complain or bark, I’ll forget to feed it and so would like it to be as antibacterial as possible. What do you think?
Hi Kath! Apologies for the delay here. You can use orange juice in place of the pineapple juice or water.
Hi! We have a local mill and I’d like to use their flour. Will any type work, or does it need to be AP or bread flour. I really like their einkorn flour. Thank you! I’m excited to give this a go.
Hi Cate. Einkorn has a slightly weaker gluten-structure, so while it will be a great food source for building a starter initially, I might consider switching to bread flour after a few days — if for instance you aren’t seeing any rise, it could be bc the gluten structure is too weak. Switching to bread flour when you make the offshoot (Day 5) might help. Alternatively, you could use a mix of bread flour and the einkorn flour.
Hello, Ali,
I will be starting my starter today. I was only able to find pineapple juice with added ingredients such as, concentrated apple juice, citric acid, and natural flavours. Do you think this would work, or should I just stick with water?
Thank you
Hi Donna! Sorry for the delay here. I think that pineapple juice you have on hand will be fine. If you are concerned, you can use orange juice or water.
It is day 2, when I opened up my container- it was dark looking, but when I mixed it up it went back to original color. Do I need to start over? I am using a rectangle large container from Baking Steel Pizza Guy.
Maybe there is too much air in my container?
Maybe my starter is not cozy and too cold?
Thanks for your assistance.
How larger is the container? Mine is 7 inches across if that helps as a reference point. You definitely want to try to find a cozy-ish spot in these winter months.
My plastic container is 14 inches long. Today I transferred it to a glass jar. I will see how it goes and maybe I will start over. It is parked in my oven.
Got it 👍
I’m on day 8 of the sour dough challenge. Mine has not risen since day 5 and does not pass the float test. Also have started finding moldy growth in my starter vessel. Do I need to start over?
Ugh, bummer, Michael. I’m really sorry to hear this. Mold unfortunately means you do need to start over.
Recipe for starter
Hi! It’s in the recipe box above.
I am on day 5 of building a sourdough starter. My starter has barely gone above the rubber band at all. I did uses King Arthur bread flour from day one. My kitchen is cold especially at night but I am using a sourdough hearter from Amazon set at 80 degrees. Any suggestions?
Thanks
Hi! It is possible that given the time of year, it may just take as long as 2 weeks. Question: you don’t have RO water in your house do you? Or are you concerned about your water source for any reason?
I do have RO water and have been using it. Is that bad?
Unfortunately RO water is not ideal because the purification process removes essential minerals (like calcium and magnesium) and microbes that yeast and bacteria need to thrive. If you are open to buying a jug of spring water that will help. And if you are also open to finding either organic KA flour or, better, if you have a whole foods or co-op near you that sells stone-milled flour, I think you’ll see results faster — there are more microbes in those sorts of flours that the yeasts and bacteria will thrive on.
Hi! I am on day four, and I don’t think that there will be enough room in my jar (it’s a larger mason jar) for it to double. Should I transfer it to a different container , and how big should said container be?
Yes! I use a 2-quart container, so anything roughly that size will work.
ok thank you!
I love the emails and the step by step instructions. But I had a few questions. I started the process at night as opposed to morning. Will that make a difference? And second, my starter almost double yesterday when we first removed more of it into discard. But from this morning to now it hasn’t risen much? Should I be concerned?
Great to read all of this, Amy! Starting in the evening will not make a difference. And it is totally normal to see spurts of activity followed by spurts of sluggishness. Just push on with the process. Try to keep it cozy. And do keep in mind that it may take as long as 2 weeks for your starter to really thrive.
Hi Ali. I live in Syracuse and my house is old and drafty. I made a warm draft free spot for my starter and it was doing well until day 4 when my schedule changed making it necessary to change the starters schedule by a few hours. I stirred in my additives a few hours early and thats where it turned off. There has been no volume change and very few bubbles. It also seems to be separating a bit with a slight slick of water on the top. I am using farmer ground flour from Trumansburg that im fortunate to get at my co-op. I went ahead with day 5 just in case, any suggestions?
Hi Sam! Apologies for the delay here. Just know that these types of fluctuations, especially in the building phase, are normal: it’s common to see a burst of activity, followed by a sluggish state. The separation is a sign that it needs to be fed, meaning discard most of it, leaving just a tablespoon or two behind (roughly 50 grams), then feed it with fresh flour and water by weight. I’m glad you continued on with step 5. Twice a day feedings and keeping your starter cozy is the name of the game at this point.
Are you on Day 7 now? How is it looking?
I’m raring to go to make your sourdough starter with pineapple juice.
In terms of flour, I can onnly find Cairn Spring All flour locally but can only order the Bread flour (that you show in the photo) with a shipping cost nearly as much as the bag of flour. The cost being over my snack bracket.
Can I use the All Purpose or would it be better to use King Arthur Bread or Organic flour?
Ali, my sister introduced me to you with your first book several years ago and I’ve been an avid fan of so many of your incredible recipes ever since. Thank you for helping make me a better baker!
Thank you, Sal 🙂
I hear you on the shipping cost with flour… it is such a deterrent. If you can find the Cairnspring Mills all-purpose flour locally, use that — it will be way fresher than KAF bread or organic flour, and it will be loaded with beneficial microbes that will help your starter grow and thrive. I do recommend organic KAF to anyone who cannot find stone-milled, freshly milled flour like Cairnspring Mills bc the organic flour will likely have more beneficial nutrients than conventional flour.
Good luck with it! And thank you and your sister again for the kind words. Means a lot.
Thanks so much for your quick and helpful response, Ali.
I’ve been using KAB regular flours for years but going forward I plan to use the organic ones.
Some good news — have been able to find the Cairn Spring bread flour locally.
Tonight I start the sourdough process!
And just around the corner, it’s your delicious Hot Cross Buns for Easter!
😍
Oh yay! Great to hear you were able to find the Cairnspring Mills bread flour locally… I am jealous. Good luck on your starter-from-scratch journey 🙂
Hi! Just wondering if we cover with a tight fitting lid or leave it loose? Thanks!
If you are using something like a deli container with a lid, you can cover it tightly. If you are using something like a Weck jar with metal clasps, do not use the clasps — simply set the glass lid on top. If you’re using a screw top lid, do not screw it on tightly. You want the starter to be protected from drying out, but you don’t want to create such a sealed environment that it explodes.
Hi, Ali
Starting Day 5 — the starter had been doing nicely through Day 4. Added the 128/128 to it, taped the container and 12 hours later nothing has moved. It’s been proofing in oven with light on – the inside temp about 70 – 72. My toaster oven has a proofing temp of 80 (no lower). I’m thinking I might do better keeping the starter in there going forward. Your thoughts/suggestions would be very much appreciated!
Hi Sally! Apologies for the delay here. As long as the oven temp is accurate, then that 70-72ºF environment should be a great spot for your starter.
Questions: What kind of flour are you using? And what kind of water? It’s not RO water is it?
Me again, Ali.
My 24 hr stretches start at night. Yesterday, 12 hr into day 4, I stirred at 10 hours, then put it in my proof (80) for 2 hr when it had reached 80, put in oven (72- 74ish) until last night when I began day 5. Used 85 degree water, placed in proof oven for 40 min then oven overnight. Some activity but has not budge at all. Slightly discouraged –sigh. I’ve put it in the proofer this morning for 40 still if that helps. My question – is it still good? should I continue this process until I see the 25-50% rise before I start day 6?
Hi again! I responded to another comment already, but I’m thinking maybe either your water source or your flour source is not providing the optimal environment for your starter to thrive. You could try picking up a bottle of spring or mineral water, and if you are not using a stone-milled/freshly milled flour, you may want to order some or at the very least use an organic commercial flour like KAF or Bob’s Red Mill.
Do not give up! You’ve come so far, and it can take as long as 2 weeks. The pineapple juice is meant to shorten that timeline but other factors can thwart the progress.
At this point in the process the name of the game is feeding 2x a day: discard most of it leaving just 50 grams of starter or so in the jar, then feed with equal parts by weight flour and water (100 grams or so of each). Stir, let it rest, repeat 12 hours later.
Thank you for both your fast responses.
I am using the Cairn Springs Mills bread flour and regular tap water.
So if I understand correctly, I will continue to feed the starter every twelve hours now,
keep it in the 72-74 oven, assuming the discard goes into the bucket, and do a “starter
dance”😍
Thanks so much for trouble shooting this for me!
Correct! Don’t heat up the water, and if you are at all concerned about your water source, buy a jug of spring or mineral water. And yes, only keep it in the oven if you are confident of the temperature staying in that range — for example, the oven light can be too warm in some ovens, so I caution against using that. Yes to the discard going into the bucket. And yes to the starter dance!! 💃💃💃💃
I will buy some mineral water – just in case. No water heating.
With the oven light on it stays in that range and certainly wormer than my counter where it’s 68 during the day and 63 at night. My oven is a Viking and is 18 years old.
😀
Ok, great! Good luck moving forward… keep me posted 🙂
So happy to report, Ali, I believe my starter has lift off. Until 12 hr through Day 7 nothing budged, yesterday, same timing Day 8, it moved about 1/2 inch. This morning, again 12 hr in, it has now nearly doubled. It passed the water test too! I’m about to dance a jig here!! And to encourage readers, as you’ve done so beautifully for me, to keep going, it will happen even though you might question will it?
Sourdough loaves of thanks, Ali, for all your hand holding through the process of success!
🩵
Hooray! I’m so, so happy to hear this. Your questions prompted me to revisit the recipe, which I did using a variety of Cairnspring Mills flours I’ve had on hand and water. I think I’ve overstated the importance of the pineapple juice and understated the importance of using good flour and keeping your starter cozy. The stone-milled flour is truly like rocket fuel, and I think anyone embarking on this experiment, should invest in a bag of good stone-milled flour. Next, I do think keeping your starter in a warm spot — I did the warm oven trick, meaning I turned my oven on for one minute, then shut it off, and kept my growing starter in there with the light off (because my oven light is too powerful) — is the second key to success. And, finally, I think water source is also important. I am going to update the recipe very soon. So thank you for asking good questions and for being persistent with your starter. It is such a fun thing to observe growth in a simple mix of flour and water 🙂
Very helpful tips for the starter. I have now baked 3 loaves of Basic sourdough bread and is is very good.
Here is my question.
I use 100 grams of starter and I am almost out of starter. (my kitchen is cold)I decided to get the starter out of the refrigerator and just add flour and water to build it back up. Is this ok to do?
Should I add this before I put the starter back in the refrigerator after making a loaf?
I bake a load about once a week.
Thanks,
Eileen
Hi Eileen,
Roughly how much starter was in the fridge before you pulled it out?
This is my general maintanence process: Remove starter from fridge and discard most of it, down to just a few tablespoons (50 grams or so). Feed it with 75-100 grams each flour and water. Stir, mark the height, let it double. At this point, I can use the starter in a bread recipe or I can return it to the fridge. You want to store the starter at its peak/doubled height.
Does that clarify? Let me know if there is anything else.
Hi Ali!
I tried the starter but on day 4, I did not pass the float test. It was so sad. I loved that little starter from the get-go.
I’m curious where I went wrong. My hypothesis is that the temp was low. We live in a “cold” log house in the PNW. Turn our heat down to 55 at night and up to 68 during the day. I placed the starter next to a heater vent (forced air) but it’s not consistant throughout the day. Could temp have affected my starter failure?
We have heated floors in our bathrooms. I thought for my next go, perhaps wrapping the vessel and placing it on the bathroom floor? If indeed you think it could be temp.
The other question I had was this.. I bought fresh milled bread flour from our local market. I stored it in the fridge (I’ve read somewhere this is prudent for fresh flours). Would all purpose flour be better?
Thanks so very much! I adore your blog and everything I’ve ever made has been a 10!
Andrea
Andrea, hello! And I hope you didn’t toss it, did you? In colder months, it can take as long as 2 weeks to develop a thriving starter, and even though you are not seeing anything yet, your 4-day old starter holds so much promise.
Some thoughts: Your heated floors are a great idea! You do need a cozy environment for your starter to rise. An alternative to the heated floors, is to create a cozy environment in your oven. Turn your oven on (at any temp), then turn it off 1 minute later. This brief blast of heat will create a cozy environment for your starter to rise. Ideally, your starter is rising in a 75º-80ºF environment.
Your cold flour is not helping. Given how cool your house is, you can store your flour at room temperature without issue. Keeping it at room temp will help your starter thrive.
If you haven’t tossed your starter, push on with the recipe. Let me know if you have any questions.
Ali,
Thank you for your reply and all of your recommendations!! I will apply them to my next attempt. Sadly, I did toss it. I didn’t quite understand the timeline could be longer.. Darn!
But now I know. I’ll be more patient and warm it up:)
Appreciate you and this amazing website you’ve created! It’s my go-to for many things.
I’ll keep you posted..
-Andrea
Sounds good, Andrea!
Hi Ali,
Just a quick question/update..
I started my starter again. This time I placed it on our heated floor at 80 degrees F, so it has lived in a constantly cozy enviroment. I used pineapple juice and I bought Cairnspring Mills flour and used this. (To my surprise, they are located just a couple hours north of me.. yay!)
This morning is 24 hours after day 4, and sadly, I didn’t notice a rise. However, I do see “action” as in, the bubbles closely resembled the image you have posted for day 4. I tried a float test from the top, and of course it sank. I stirred it once during this 24 hour period. I had been using an airtight lid and had noticed some condensation inside the vessel.
I read through prior comments to problem solve the lack of rise and failed float test.. so here is what I’ve done.
-Added 128 g of flour + water this morning and stirred it in.
-Carefully wiped off the condensation from the sides of the vessel and replaced the secure top with a tea cloth and secured it with a rubber band.
-Sent a love prayer to this little thing 🙂
What are your thoughts.. is there anything else I should do?
Appreciate you!
-Andrea
Hi! I’m happy to hear you’ve re-started, and great to hear you can find CSM flour locally. My only suggestion would be to try the warm oven trick to make an even cozier environment for your starter.
Question: is your water RO? And if not, do you have any other concerns about your water source?
Ali–
I passed the float test this morning!
I repeated step 4 for two more days, and today was the day!
I’ve got it in a jar with a rubberband marker, and it is nicely doubling.
Plus.. I’m about 7 hours into a fococcia rising nicely as well!
Thank you for your help and solid gold guidance!
You’re the best!
-Andrea
Amazing news, Andrea! Thanks so much for sharing your updates. And congrats on your persistence: that is the name of the game when building a sourdough starter 🙂
Do you seal the starter in your vessel air tight or loose fitting on the lid when making a new batch?
I seal it when I use plastic quart containers or 2-quart containers. Do not seal it if you are using a glass vessel with clamps — set the glass lid on top but do not use the clasps. You want it to be mostly sealed to prevent a crust from forming on the top layer.
How long can I keep the discard in the fridge? I’m making crackers but still have loads leftover. At what point do you start throwing away the discard?
I’d say you can keep it for at least 2 weeks. Here’s a great one that uses up a lot: Sourdough Discard Sandwich Bread. I made the double recipe recently, and it was so delicious. I froze one of the loaves. I’ll be adding the recipe to my site soon.
Hi Ali! I messaged you on IG as well and now trying my luck as I’m sure you’re too busy to keep up with the DMs. I have a couple of questions:
Can I start saving discard right from the get go or will it be no good this early in the game?
I’m on day 7 today and while my starter is rising above my rubber band, it’s not doubling by any stretch. On day 5, I had to skip a feeding and ending up putting it in the fridge 🤦♀️. Have I ruined my chances? I’ve been feeding it twice a day since then and keeping it in my oven.
I’m so glad you are doing this, Hina! Yes, save your discard right from the get go.
No, you definitely did not ruin it by putting it in the fridge — that was the right thing to do, and you can pick up where you left off by continuing with 2x a day feedings and storing it in a cozy spot. Do you think you’ve been creating a cozy enough spot for your starter? And what kind of flour are you using?
Thanks for your response Ali!! I’ve definitely been ploughing on with the twice daily feedings, I’m excited to see the progress once I get home today.
I have a vat of discard now lol so I’ll be spending my day off using the sourdough discard recipes you’ve sent.
I’ve been storing my starter using the warm oven technique you shared bc its still too cold in northern Virginia. In terms of flour, I’m using KAF bread flour. I think the stone-milled would be a bit much for me to keep up with. Do you think my starter environment and food is okay?
Update: After yesterday’s two feedings, this morning I again had the same result, maybe a half inch over my rubber band. Fed again this am and placed in briefly warmed oven.
OK! Well that is progress. It is a tedious process at this stage. What day are you on now? I do think some stone-milled flour might help your progress. Organic flour might help too — Bob’s Red Mill organic flour might be a good option.
Hi Hina! Great to hear re warm oven technique. Another tip: Leave a pitcher of water out at room temperature, both so that it’s warmer than the tap water and also to allow any chlorine in it to evaporate. You don’t have RO water, right?
I was thinking of trying Rye flour. Should I just do organic KAF? I’ll also try to see if I can find some stone milled. Same result after my last comment. I’m getting a little worried now haha bc I had high hopes when I got home last night from work. For water, I’m using bottled spring water because although I don’t have reverse osmosis water, our tap water has chlorines and chloramines.
Great to hear you are using bottled spring water. And are you keeping it at room temperature? I would if you are not.
I would try the organic KAF or a mix of the rye with the organic KAF. Rye is tricky bc it has a weaker gluten structure and you might not get the rise from your starter that you would from a bread or ap flour.
Update: I made a smaller jar and started feeding it a smaller amount of flour and water, half rye and half organic AP flour and we’re almost there!! I’m so excited.
I did have a question though, in all of my googling I keep seeing things about not keeping discard from a new starter and how it’s “dangerous”, but I have been keeping it as you advised and using it. Can I please have your thoughts on this?
Great to hear, Hina! Thanks for circling back to share your updated.
I have never had an issue using “young” discard — it makes no sense to me how that could be dangerous? I believe you in that that information is out there! I just can’t make sense of that. I will do some googling 🙂
Thanks for your quick response Ali!! I completely (in all my novice experience lol) agree with you and I’m relieved to hear you say it too! Every discard recipe I’ve made from you has been perfect and delicious (namely the crackers, sandwich bread which my family has gone crazy over, and the pancakes). I look forward to hearing your about your google search.
I’m so happy to hear this, Hina! I will circle back when I find some answers 🙂
Can’t wait to see your take on it Ali! Also, happy update: we’re consistently doubling! I’m finding that by the time I get to it, it’s risen and fallen!
Yay!! I’m so happy to hear this, Hina 🙂
Another update 😬: still not consistently doubling. One feeding I’ll have success and it doubles and the next one it rises but won’t double (not missing it bc I’m keeping a close eye). I’m doing my best keeping it cozy, room temp spring water, and a ratio of a small amount of rye flour and the rest organic all purpose. It looks and smells so promising, like all of the pictures and videos I’ve seen of bubbly active starter but it just isn’t consistently doubling.
I’m starting to lose it a little 🤣.
Also, I did dump my original massive vat of starter and now I have a new one starting lol. How did your googling go?
Hi! One thought, now that your starter is definitely getting stronger: try one feeding with all bread flour — do you have bread flour on hand? The gluten strength it will provide might give you a stronger lift.
Regarding googling, I found information saying that young discard might be harboring harmful bacteria, and while that might be true (though I’m still skeptical), the bacteria will definitely be killed in the cooking process — the breads, pancakes, waffles, etc. all get up to temperatures where those bacteria will not survive. So unless we’re eating the discard by the spoonful, I think we’re safe 🙂
I meant vat of discard got dumped, not starter sorry.
Okay I will try bread flour! Thanks Aly! Should I stick to the small amount of starter when I’m feeding or switch to 1:1:1 until it’s stronger?
Great 🙂 You can stick to the smaller amount: 1:2:2
Starter hasn’t done much. I used rye flour which I understand makes strong starter. Every thing else is by y your guidance
BTW on day 3 in socal. House is 69 -70 degrees. No odor seems to be loosening up as I stir more
Hi Bruce! Have you tried the warm oven trick (preheating for 1 minutes, then shutting it off)? Or leaving your oven light on for 15 minutes (but not longer)? I think you will see much more progress if you can get the cozy environment to be in the 75-80ºF range.
Your water isn’t RO water, is it?
Did put in oven last evening without light or off/on but doesn’t look any different yet. Maybe rye flour has different timetable.
Ill do day 4 treatment today.
OK, yes push on with day 4. I would try either preheating your oven for a minute or leaving the light on just for 10-15 minutes to create that cozy spot. Just don’t forget to turn off the light. And yes, it’s possible rye flour has a different timetable. I know rye is wonderful for starters, but it also has a weaker gluten structure, so it might be harder to get some rise out of your 100% rye starter.
Perhaps I should incorporate a different floor at this point?
I think that’s a great idea. If you are open to getting a bag of organic KAF or Bob’s Red Mill or a bag of stone-milled flour if you have a source at one of your local markets.
BTW on day 3 in socal. House is 69 -70 degrees. No odor seems to be loosening up as I stir more
Hi Ali. I have a cold kitchen and one of those Brod and Taylor warming appliances. The cambro container will not fit into the Brod and Taylor – can I halve the initial recipe and start with a Weck jar? The last time I tried to make a starter, I put it into my oven and my warning sticky fell off so I cooked my starter! LOL
Giving this 5 stars because I have both of your books and have made your peasant bread and mustard sauce among other recipes so I know this would come out perfect if only I had a warm kitchen.
Aww, thanks, Peg!
Try a half recipe! I’d love to hear how it turns out. Part of the idea of starting with a larger amount of flour is that you’re starting with a larger pool of microbes, which you are trying to multiply/colonize. Ultimately, you want the beneficial microbes to thrive/multiply, and the less desirable bacteria to die off. So by starting with more flour, you have a bigger pool to “select” from. That said, my sense is that a half recipe would work really well, especially if you are keeping it cozy — that is the name of the game!
Hi Ali, I’m following your email tutorial. I’m on Day 4–up until now my starter had risen just a bit. I fed only once yesterday as directed. This morning my starter was quite bubbly and well over doubled! Here’s what I did:
I scooped out a bit and dropped it in a glass of water. It floated.
Then, I stirred it and dropped a bit in water. It sank.
My container is a 2 quart glass one and it was almost full. Now that I’ve stirred, it’s dropped down a bit.
So–do I just feed it again today? (Wondering if it rises too much will I need an offshoot…)
Thanks so much for all you do!
…also…I’m not there yet, but should I be saving all discard once I start an offshoot? (And would that just be in a container in the fridge?)
Yes! Save all the discard and store it in the fridge.
Hi! That makes sense: when you do the float test, you should be scooping it off the top. If you stir it up, you deflate it, and it will likely sink. So, you’re all good there 🙂
Your 2-quart vessel should be large enough, but it sounds as though it rising/behaving nicely, so I think you could make the offshoot now: transfer 100 grams to a new vessel, feed it with 100 grams each flour and water. Your original bucket can now be your discard bucket, and you can store that in the fridge.
Let me know how it progresses 🙂
Wow, that will be lots of discard. 🙂
And yes, I will!
C
Hi Ali,
We are on Day 4 today & my starter had only about 10 bubbles on top. I’m using a hard red wheat flour which is ground at a local mill. I have seen bubbles on the sides of the container but not too much on top. Do you think this flour will just take longer? The started does have a nice tangy taste to it.
Hi! Is your house cool? And if so, are you doing anything to create a cozy space for your starter to hang out in? Finally are you at all concerned about your water source? Is it RO water?
Hi Ali — On day 2 my starter was nice and bubbly. I added the128g each of flour and water, marked my 2-quart Cambro with tape, and kept it cozy. Not only has it not risen, it appears to have flat-lined. No bubbles anymore, no “body” to it — just watery and lifeless. Should I toss it and start over? Or..??
Don’t toss it! It is common for a starter to go gangbusters in the beginning due to the rush of activity as the wild yeasts and bacteria feed like crazy on all of the “food” (the flour/water). As your starter matures/ripens, it becomes more acidic, and some of these microbes can’t survive… as they die off, the starter looks inactive, but it just needs time: more consistent feedings with fresh food and water and a warm place to rise.
Just keep at it with the feedings… it becomes a tedious process and, may take as long as 2 weeks to double consistently.
What kind of flour are you using?
I started with 25g each of rye and King Arthur’s new white whole wheat which was recently purchased, and 142g KA AP. On day 3, I did the same with 14g/14g/100g. As the day wore on. yesterday, I noticed the watery “lifeless”mixture had started to thicken. Aha! So in the evening I fed it 128g of AP and instead of keeping it at room temp put it on a dough heating pad which is set to 85 degrees. This morning it has not risen at all but it is full of life and bubbles! Hooray! Thank you for your encouragement, Ali!
OK! Bubbles are a great sign. I hope your offshoot behaves well for you. Can you share more about your dough heating pad? I am curious about it. Are you able to set it to 80ºF? 85ºF is fine but potentially bordering on being too hot.
I have this one, though I paid only $65 for it a few months ago. I wish the temp was set for 80F. It is not variable. I leave the lid of my Cambro a little ajar so it won’t get too warm. btw, I’m using my discard today for a loaf of focaccia🤞as I already have a ripe starter handy. (I’m doing the grow-your-own-starter project with you because I’ve never tried to do it before.)
https://shop.kingarthurbaking.com/items/raisenne-dough-riser
Thank you for sharing this! I am always on the hunt for easy ways for people to keep their starters cozy. I hope your discard focaccia turns out well 🙂 And I’m so glad you’ve joined the course despite having an already thriving starter on hand. I am a huge proponent of people buying mature starters and just getting after it — taking care of a mature starter is a great way to learn how to care for a baby one 🙂