 →
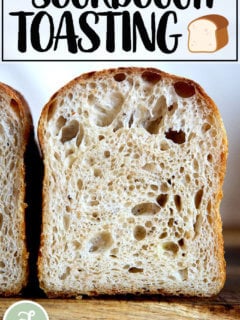
→ Easy Sourdough Sandwich Bread
This post may contain affiliate links. Please read my disclosure policy.
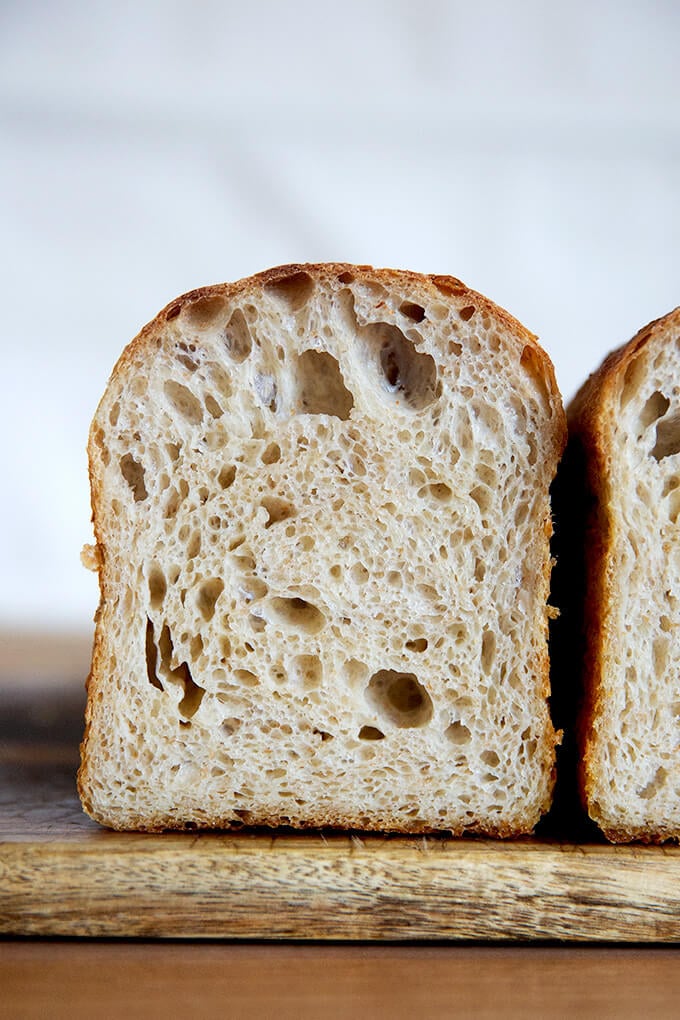
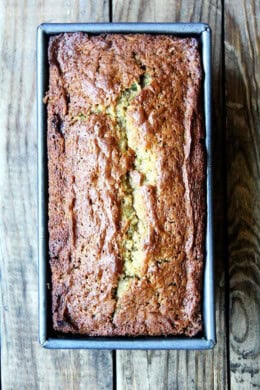
This 4-ingredient sourdough sandwich bread requires no complicated shaping, no scoring, and no preheated heavy Dutch oven. Grab your mixing bowl, pull out a spatula, and butter your loaf pan. This one is simple and delicious!
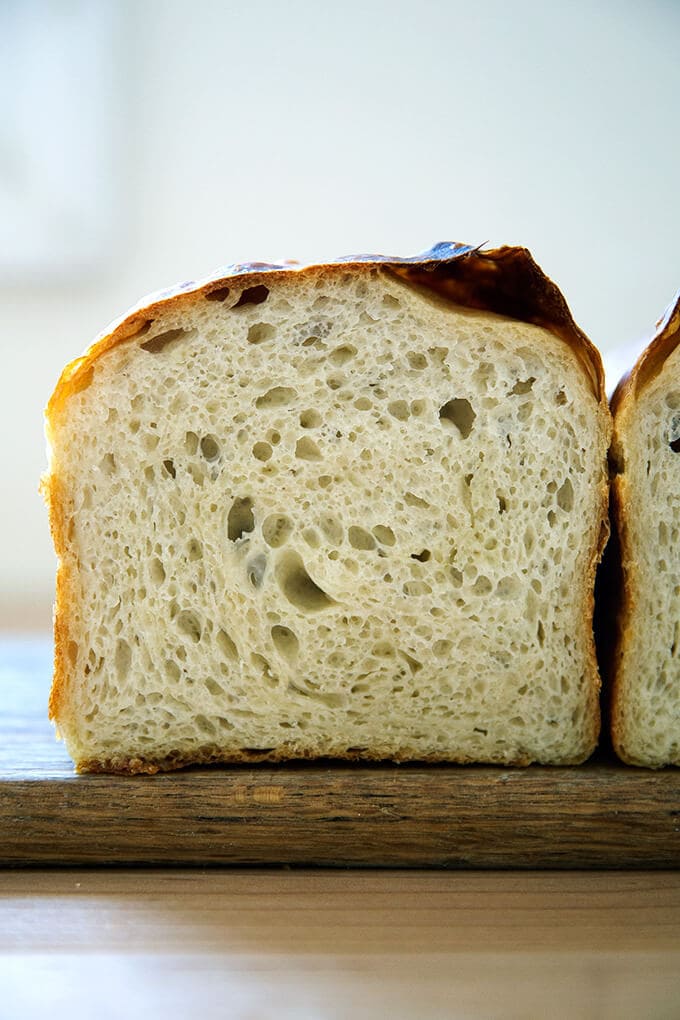
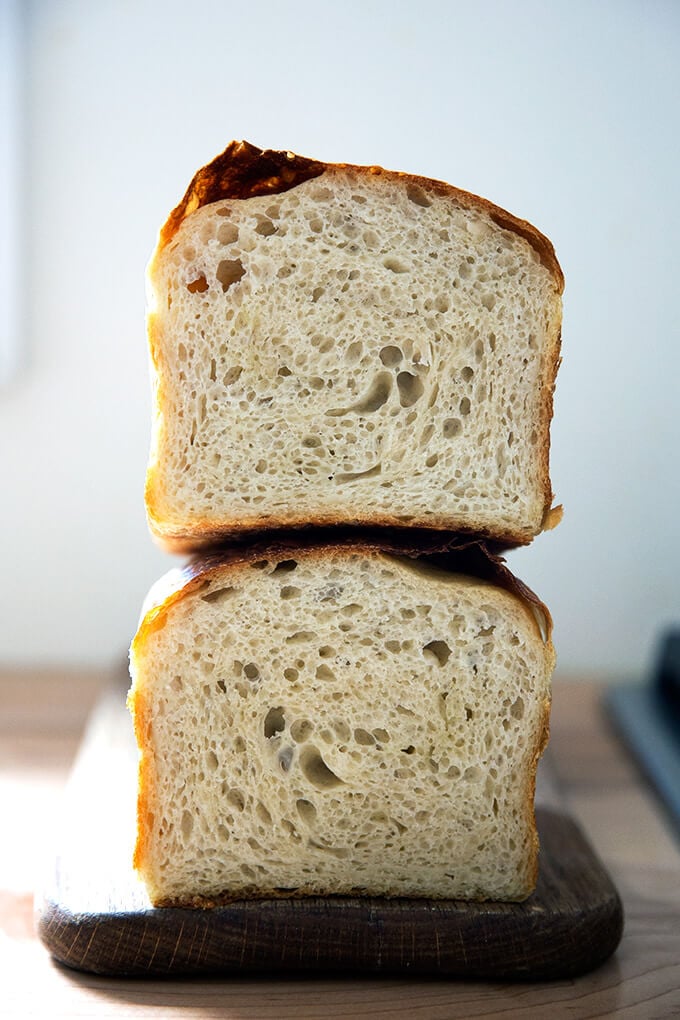
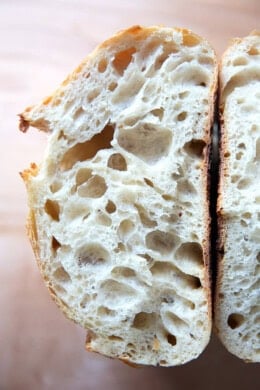
As its name suggests, this sourdough sandwich bread recipe is easy, a simple mix of flour, water, salt, and sourdough starter. In sum, it’s an adaptation of my mother’s peasant bread recipe with the sugar and yeast omitted and sourdough starter added. Like this sourdough focaccia, the dough is high-hydration, which yields a soft crumb, perfect for sandwiches when freshly baked and excellent for toast, too.
In the world of sourdough bread baking, crusty boules, open-crumbed rolls, and pillowy focaccia get all the glory. But I would argue a simple sandwich loaf deserves just as much praise, if not more, not only for its ease in assembly, but also its utility.
Find step-by-step instructions as well as video guidance below.
PS: How to Build a Sourdough Strater from Scratch
PPS: How to Activate, Feed, and Maintain A Sourdough Starter
How to Make Sourdough Sandwich Bread, Step by Step
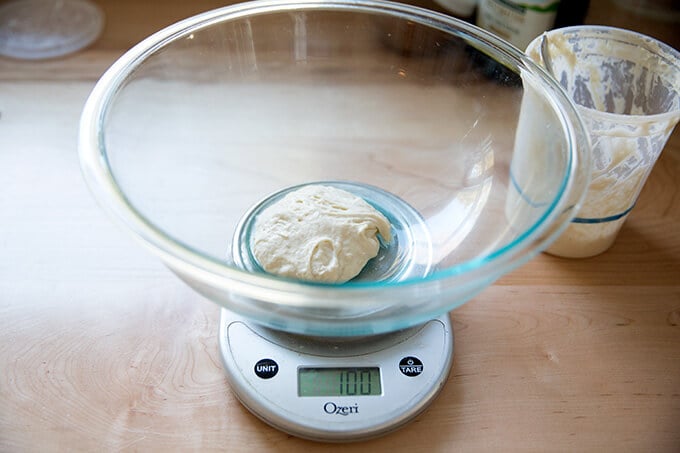
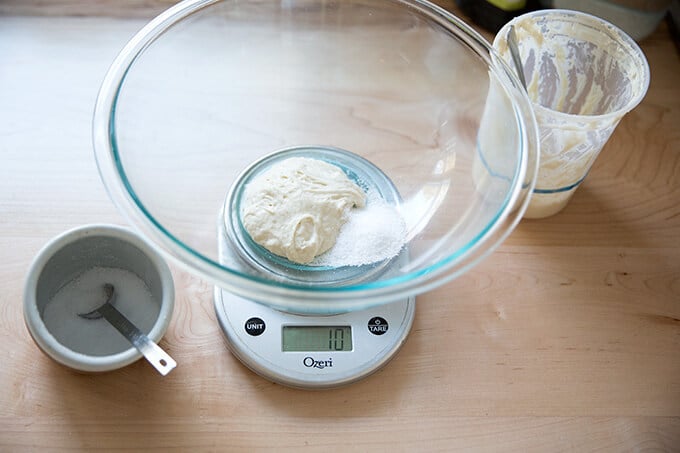
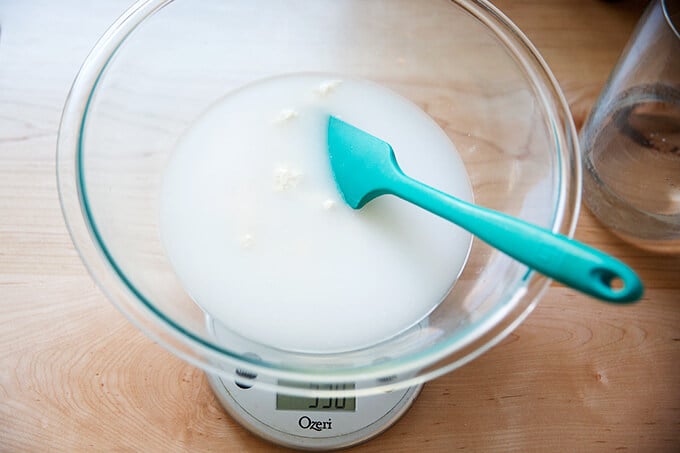
First, place 100 grams of starter in a large bowl. As always, for best results, please use a digital scale to measure.
Add 10 grams of salt.
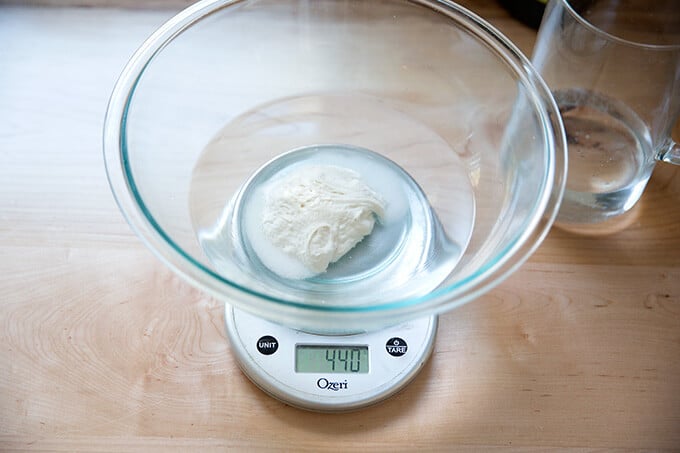
Add 430 grams of water. (You may need to use less water: see recipe box for notes.)
Stir to combine.
Then add 512 grams of bread flour.
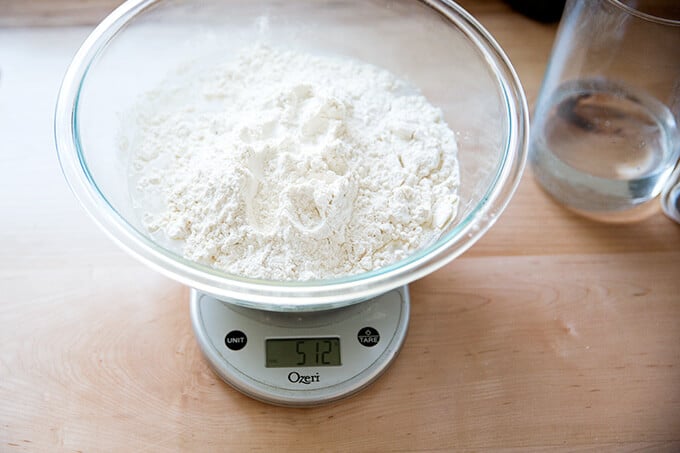
Stir to form a sticky dough ball.

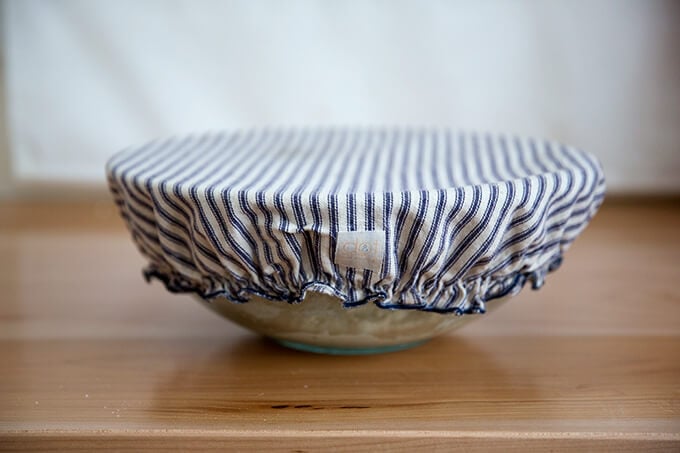
Cover with a towel or cloth bowl cover or, preferably, a lidded vessel, and let rest for 30 minutes.
Then, perform a series of stretches and folds. See video for guidance (skip ahead to 1:13). Repeat this 3 more times for a total of 4 sets of stretches and folds during the first two hours. Then, let rise for 6 to 18 hours* (see recipe notes) at room temperature:
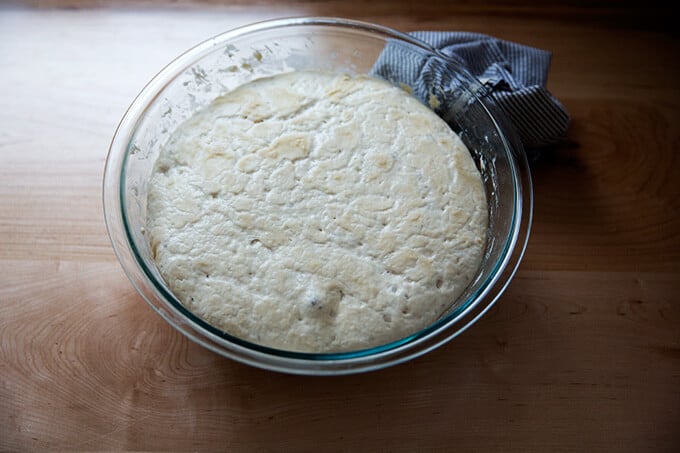
Drizzle the surface of the dough with a little bit of olive oil; then fold the dough inwards from the sides to deflate.
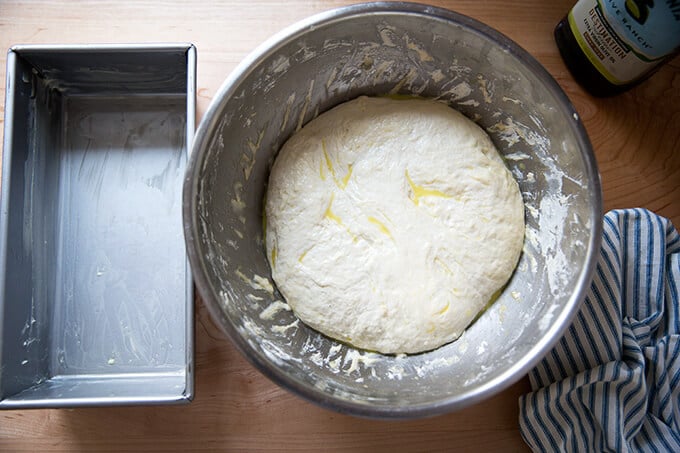
Transfer the dough to a large, buttered loaf pan. I use this 10 x 5-inch loaf pan but a 9×5-inch loaf pan will also work.
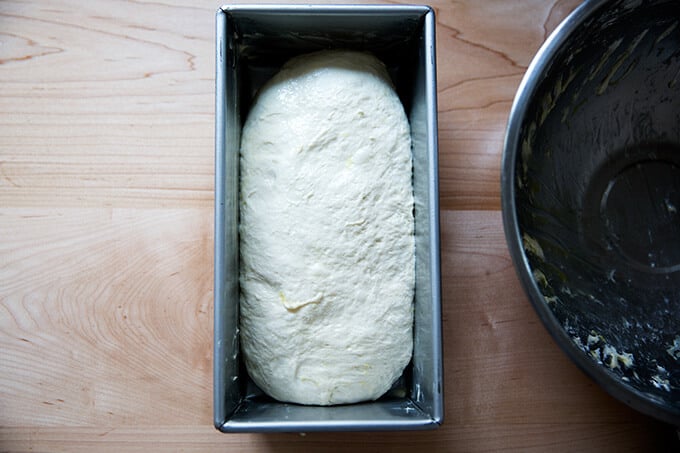
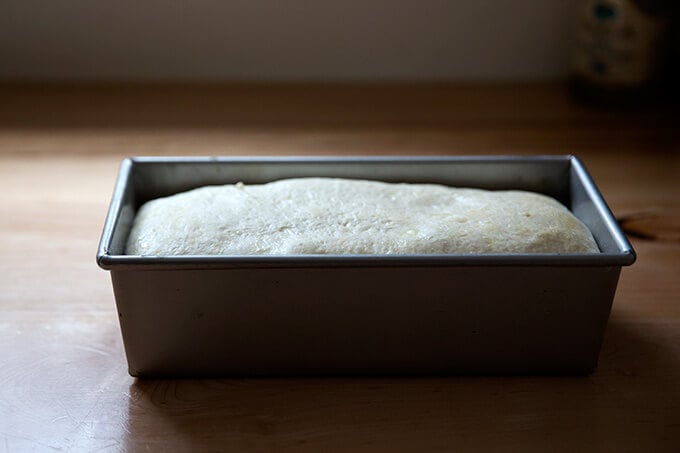
Let the dough rise just until it begins to crown the rim of the pan, about 6 hours.
Bake for about 45 minutes or until golden brown all around.

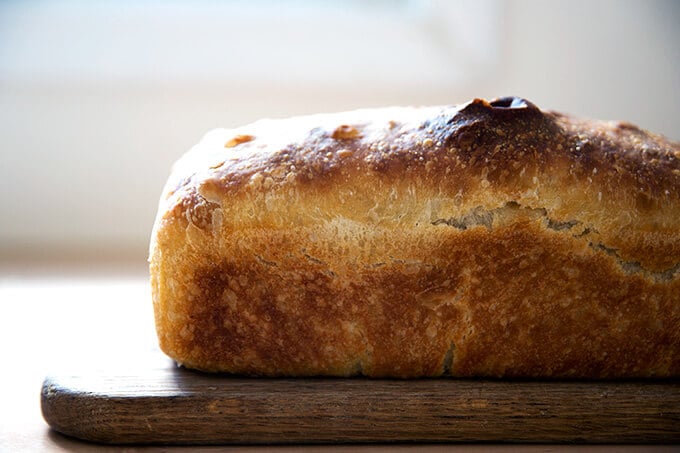
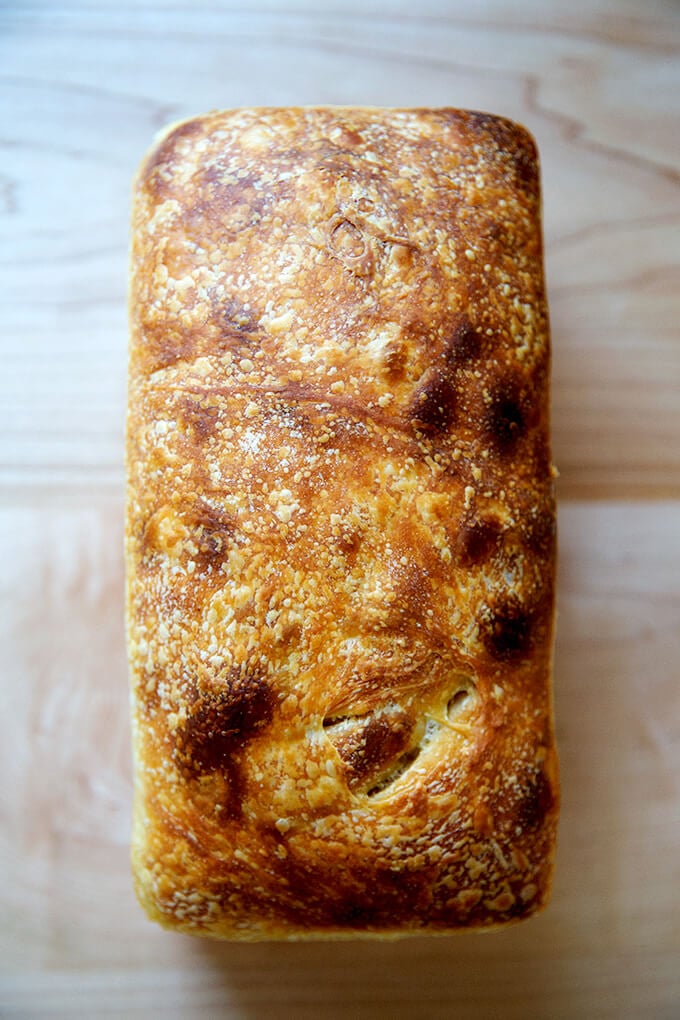
Let cool for at least 30 minutes before slicing.
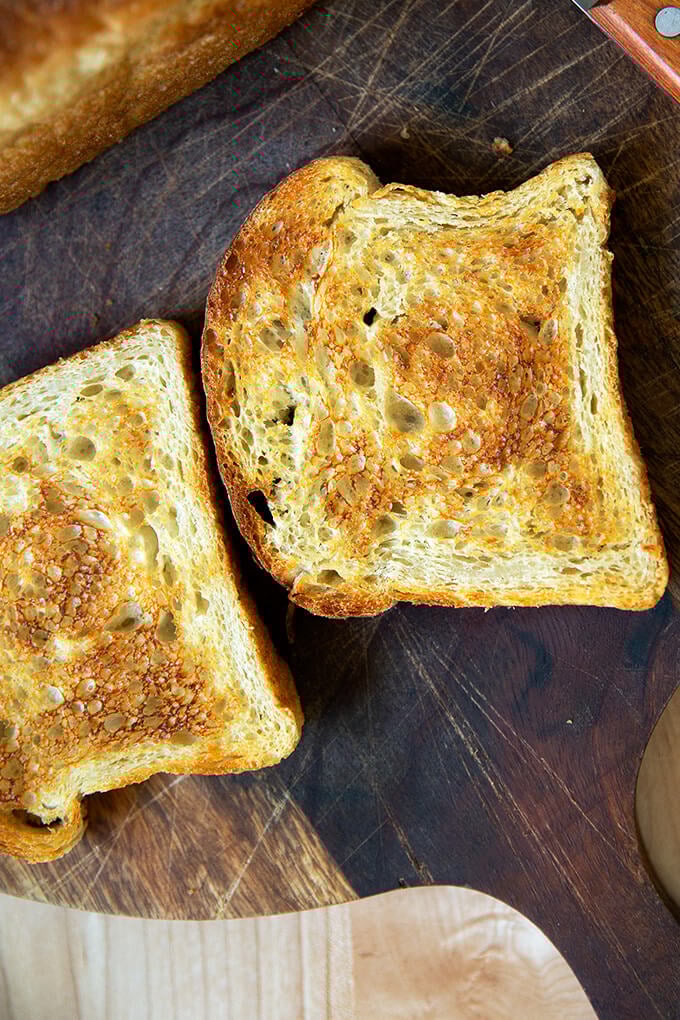
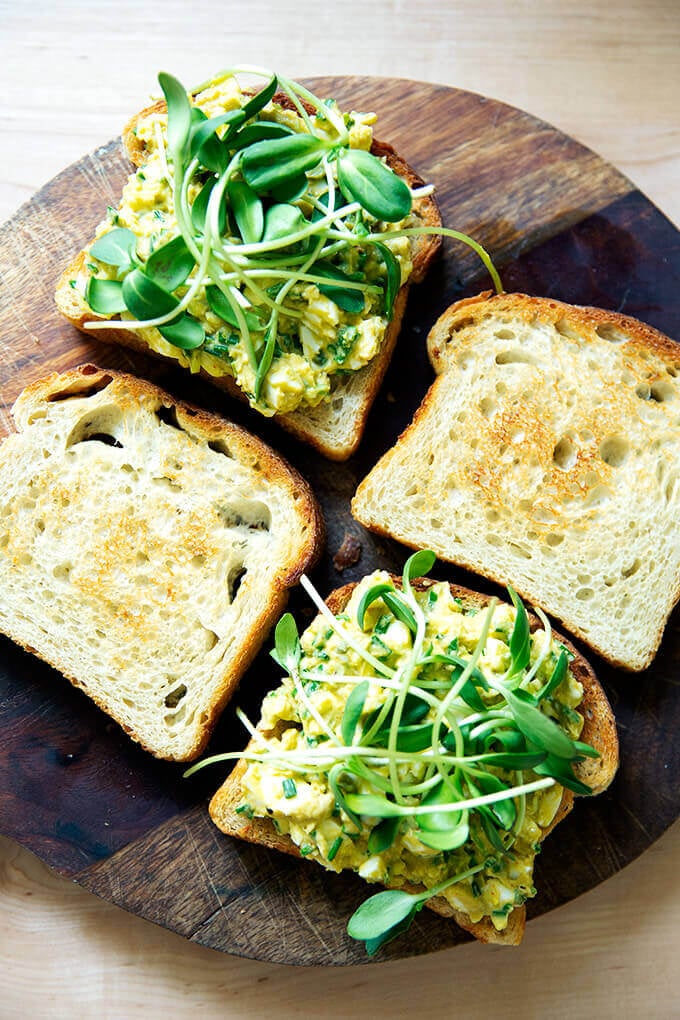
It makes excellent toast, too.
I love this tall-sided pullman loaf pan, too:

Easy Sourdough Sandwich Bread
- Total Time: 24 hours 40 minutes
- Yield: 1 loaf 1x
Description
This easy sourdough sandwich bread requires no complicated shaping, no scoring, and no preheated heavy Dutch oven. Grab your mixing bowl, pull out a spatula, and butter your loaf pan. This one is simple and delicious!
Notes:
Pan: You’ll need either a 10 x 5-inch loaf pan or a 9×5-inch loaf pan.
Plan ahead: This dough rises first for 6 to 18 hours (or less if it is super hot out or if you live in a humid area) or until the dough doubles in volume; then again for about 4 to 6 hours or until the dough crowns the rim of the baking vessel.
Troubleshooting: If you have issues with your dough being too sticky, please read this post: Why is my sourdough so sticky? The 4 common mistakes.
If you’re just getting started with sourdough, check out this post first. You’ll find tips there on procuring a starter as well as how to feed it and maintain it. If you’re up for making your starter from scratch, you can do so in just about 1 week.
Water: Chlorine in water can adversely affect sourdough. Leaving water at room temperature for 24 hours will allow most of the chlorine to escape. When I am in the habit of making sourdough bread, I fill a large pitcher with water and leave it out at room temperature. I use this for my sourdough breads and starter. Truth be told, I’ve used water straight from the tap and have not noticed a difference.
Water quantity: Also, depending on where you live and the time of year, you may need to cut the water back. If you live in a humid environment, for instance, I would suggest starting with 400 g or 420 g water. If you are not using bread flour, you also may need to cut the water back a bit. So much success with sourdough relies on getting the water quantity right.
Starter: I use a 100% hydration starter, meaning it is equal parts by weight flour and water. If you need guidance on how to maintain a starter, see this post.
Ingredients
- 100 grams (about 1/2 cup) active starter, see notes above
- 10 grams (about 2.5 teaspoons) kosher salt
- 430 grams water (or less, see notes above), room temperature
- 512 grams (4 cups) bread flour, such as King Arthur Flour
- a few tablespoons extra-virgin olive oil
- room temperature butter, for greasing
Instructions
- Mix the dough: Place the starter, salt, and water in a large bowl. Stir with a spatula to combine — it doesn’t have to be uniformly mixed. Add the flour. Mix again until the flour is completely incorporated. If you have a straight-sided vessel, transfer the dough to it — it really helps monitor the rise and allows you to see the true growth in volume of the dough.
- Perform one (or more) “stretches and folds”: 30 minutes after you mix the dough, reach into the bowl and pull the dough up and into the center. Turn the bowl quarter turns and continue this pulling 8 to 10 times. See video for guidance. If time permits, repeat this “folding” step every 30 minutes for the first two hours. (Note: even if you perform just 1 fold, your dough will be in good shape.)
- Let it rise. Drizzle with a splash of olive oil and rub to coat. Cover bowl with a tea towel, bowl cover, or a lidded vessel, and set aside to rise at room temperature (70ºF/21ºC) for 4 to 18 hours — if it is super hot out or if you live in a humid environment, it may only take 4-6 hours. When the dough has nearly doubled in volume (or UPDATE: increased in volume by 50%, which is when I now end the bulk fermentation), it is ready. (Note: Do not use an oven with the light on for the bulk fermentation — it will be too warm. It is best to rely on visual cues (increasing in volume by 50% or doubling if you’ve had success with doubling) as opposed to time to determine when the bulk fermentation is done. A straight-sided vessel makes monitoring the bulk fermentation especially easy.)
- Prepare the pan. When the dough has nearly doubled, grease a 9×5-inch loaf pan or 10 x 5-inch loaf pan with butter (or nonstick spray).
- Let it proof. Drizzle dough with a few tablespoons of olive oil. Rub your hands with a little bit of oil to coat. Use your hand to release the dough from the sides of the vessel, being careful not to completely deflate the dough. Video guidance here. Turn the dough out onto a work surface. Quickly, shape the dough into a rectangle — fold the dough envelope-style first; then use a bench scraper to shape the dough into a rough rectangle. Transfer dough, seam-side down to prepared loaf pan and gently stretch into an oblong shape. (At this point, you can transfer the pan to the fridge if it makes sense with your schedule: rub the dough with oil and cover with plastic wrap, or tuck the whole pan into a 2-gallon ziptop bag. Transfer to the fridge till the next day. Then proceed with the recipe.) Leave the pan alone for 5 to 6 hours, or until the dough reaches the rim of the pan — this may take less time when it is very warm out. Do be patient with this second rise: to get good height, the dough should be near the rim of the pan before you transfer it to the oven.
- Bake it. Heat oven to 425ºF. Transfer the pan to the oven and bake for about 20 minutes. Reduce heat to 375ºF. Bake for 20 to 25 minutes more or until golden all around. If you have an instant read thermometer, it should register 206-210ºF or so before removing. Remove the pan from the oven and turn the bread out onto a cooling rack. Cool for at least 30 minutes before slicing.
- Prep Time: 24 hours
- Cook Time: 45 minutes
- Category: Bread
- Method: Sourdough/Natural Leavening
- Cuisine: American
This post may contain affiliate links. Please read my disclosure policy.


1,483 Comments on “Easy Sourdough Sandwich Bread”
I am now making this sourdough sandwich bread with half or all full fat milk instead of all water. I find it soft and it keeps really well. I suppose you could also use dry milk mixed with the flour….
Great to hear, Gale! That makes total sense. In my yeasted sandwich bread recipe, I use milk, water, and a little butter 🙂
Hi! I have made this loaf twice. I love it!! Not getting as much of a rise during baking as I would like. Trying to adjust the amount of water I use since I’m in a humid environment. I’m down to 407 gms. I think I will reduce it to 400.
The bread is absolutely delicious!!
Great to hear the flavor is great, Gail. And nice work being persistent with the adjusting the water quantity. Are you using bread flour? You could also try adding a few more sets of stretches and folds, which will help build a little more strength in the dough.
Today will be my third time making this. We love it. Sandwiches and toast are the go to uses. I like the fact that it has a nice crust that isn’t too tough.
I am looking forward to trying some of your other recipes.
Great to hear, Susan! Thanks so much for writing 🙂
I usually lean towards the artisan boule, but I wanted to try a sandwich loaf like this one. I will say the taste is delicious but it seems far too hydrated/heavy. I’m definitely going to cut down on the water, and or maybe some starter? I think it will be great once I get the hydration in order. Not to be harsh, just honest 😊
Hey Jed! Absolutely, given your environment and the flour you are using, it’s definitely possible that less water and less starter might yield better results for you.
I tried this for the first time yesterday, The taste is pretty good But it’s pretty heavy and overly hydrated with that much water I think, I’m going to try it again With less water
Woops I replied twice lol my bad
No worries 🙂
I’m not sure if I understand correctly, I put the loaf in the fridge overnight and then take it out and let it sit for a few hours on the counter until it reaches the rim? Is this correct? It’s didfeeenr from other recipes that you bake directly from the fridge.
Thanks
Correct — the dough should be crowning the rim of the pan before it goes into the oven.
Can you add roasted garlic to the dough?
Yes!
Hi there, this is my go-to recipe for sandwich loaf bread. You have also have taught me how to make an artesian loaf, and maintain a sourdough starter as well, that now I’ve been able to teach my 11 year-old how to make. Your recipes are our go-to for many foods. Thank you!
I’m wondering, can I cold ferment this dough in the fridge for 12-48 hours in hopes of the ferment adding value to the loaf?
So nice to read all of this, especially that you are teaching the next generation of sourdough bakers 🙂
Yes re cold fermenting the dough after the BF. I like to get the dough in my pan, and then I stick the pan into a large 2-gallon zip-top bag. You want the dough to be protected so that it doesn’t dry out in the fridge.
When you remove the pan from the fridge, you’ll need to let it rise for several hours — just be patient and don’t let transfer it to the oven until the dough has crowned the rim of the pan.
It’s in the oven right now! I finished the sourdough starter guide and this is my first recipe using it (besides discard tortillas). I’m nervous and excited! I had to lean on fridge time a bit because it was hard to figure out timing while working. One thing I noticed that was different from your video was how bubbly mine was on the top compared to yours. I’m not sure why that happened!
Hi! Bubbles are good! I hope it turned out well for you. Would love to hear when you have a chance 🙂
I think I underbaked it a little bit (I don’t have a thermometer) because it was a bit dense and slightly undercooked in the middle of the slices…but still yummy! I will try again now that I know the routine a bit better 🙂
That happened to me as well. I went by time as I was too lazy to use my thermometer. I’ve discovered that if I use the thermometer it is perfect but I need to add 5 minutes to the cooking time listed. I cover the loaf with another loaf pan during the the first 20 minutes so that could be why it takes longer.
Ok, yeah, a thermometer will help, but a few thoughts: given your environment and the flour you are using, you may need to hold back some of the water from the start. What kind of flour are you using? And do you live in a humid environment?
Also: are you using a straight-sided vessel for the bulk fermentation?
Finally, in your previous comment about the bubbles, was that in regard to the dough or the starter?
Hello. I was wondering if I could adapt this bread for rye and wheat bread?
Hi! And yes. You could try using something like this to start: 128 grams whole wheat flour, 56 grams rye flour, 328 grams bread flour. Depending on your results, you could up the percentage of ww flour and rye flour the next time around.
Thank you Alexandra. What if I just wanted to make a Rye bread?
Hi! I would start by using 128 grams rye, 384 grams bread flour. A little rye flour goes a long way in terms of flavor imparted. Using too much will make for a very dense loaf. You could start with that ratio, then use more or less rye flour next time around based on your results.
This recipe was easy to follow as a first timer! The crust was thin but delicious, and the insides were gummy. I used a food scale to measure out 100g Starter / 430g Purified Water (room temp) / 516g King Arthur Organic Bread Flour. I mixed everything with a spatula, and only enough until there was no more clumps of dry flour along the bowl and on the outside of the dough. Bulk fermentation on the counter for 4 hours, in the fridge for 18 hrs, proofed on the counter for 3 hours. I don’t live in a humid area and it was around 77F throughout the day. For baking, I set the oven to 425F, and noticed the temp went up to 450F for about 5-10 mins of the 20 mins. Then I lowered the oven to 375F, left it for 22 mins. At the time I took out the bread, the oven was reading around 420F. The insides of the bread read 207F, and I let it rest for 1.5 hrs before I cut into it. I want to try this recipe again in a couple of days but I’m not sure where I need to make adjustments (except, maybe the oven temp). Thanks!
Hi! I think maybe you should reduce the amount of water. Try 400 grams and see if that helps. It sounds as though you are doing everything right.
Thank you. Would there be any issues if I opted to use unbleached all purpose flour in lieu of bread flour?
Should be fine! Your dough might be a little stickier. If you live in a humid environment, I’d consider holding back 25 grams or so of water.
How do you achieve that flat top? My loaf domed very high in the center, leaving two short edges which are not great for sandwiches.
Hmmm… not sure. Did you shape it the same way I shaped it in the video? Mine does taper a little bit at the edges.
Oof, this was going really well until step 5. The dough at least doubled in my straight-sided vessel and looked super happy/bubbly, but when I turned it out onto my work surface, it spread out immediately and was way too liquid to shape. I have a feeling I probably should have cut back on water at the beginning since it was a slightly warmer weekend here in Portland (nothing crazy though, 75-80 degrees), and it’s possible I slightly overproofed it. I moved the dough into the metal loaf pan and waited quite a while for it to rise (both on the counter and after a night in the fridge) to no avail. Tried baking it and it came out about half the height it should be with a weird consistency—still cooling, but unfortunately seems like this one might be a bust.
All of your other recipes I’ve tried thus far have worked really well for me and my starter seems normal/active—I primarily used bread flour with a small portion of rye + whole wheat in this one. Any advice is welcome!
Hi! Bummer to hear this, Rachel. It sounds as thought the dough over-fermented during the bulk fermentation — when this happens, the dough loses all strength/elasticity and won’t recover unfortunately. It really at this point can only be used to make crackers.
For the bulk fermentation, was the dough on your counter? Or in a cozy spot?
Next time, let the dough rise 50-75% instead. That should solve the issue. If you found the dough excessively wet when you mixed it and stretched and folded it, you can cut back the water, but I think the solution really is just a matter of shortening the bulk fermentation.
Great to know, thanks Ali for weighing in. Funny enough it actually didn’t turn out too badly, maybe a little gummy for my taste but at least have something to potentially turn into croutons or bread crumbs. 🙂 The dough was indeed kept out on the counter overnight and I made the mistake of not marking off where it was the night before—you’re right that it probably overfermented since it appeared to have more than doubled. Appreciate you and will give this one another try!
I’m happy to hear it can be salvaged by croutons or bread crumbs! I hope the next go is more successful.
Has anyone tried dividing this into 2, 8×4 loaf pans? I made the recipe as written in my 9×5 and it was HUGE, lol. This made it very difficult to cut, so thought I would try making 2 loaves out of it. Otherwise loved the taste and texture of the bread!
Hi Amy! I have not tried this, but it’s worth a shot — you might get two squatter loaves. Alternatively, you could try scaling back and make 75% of the recipe, then bake that in your 9×5 loaf. This would be the measurements:
75 grams starter
7-8 grams salt
322 grams water
384 grams flour
I’ve made this recipe for years and it is flawless. I do a cold fermentation once transferred to a loaf pan for 12 hours. Let it rise out on the counter before baking. I top the glass loaf pan with another glass loaf pan when baking. Finish the last 10min uncovered and get an incredible golden crust.
This bread is fantastic and an absolute treat lightly toasted with a little PB&J. The entire loaf is gone once it’s ready to slice (family of 4).
Wonderful to read all of this, Stash! Thanks so much for writing and sharing your notes. ALL sounds lovely 🙂
Perfect loaf on first try! I’m so pleased that it turned out so well. Followed directions exactly, except for the 2nd rise it was only 2 hours. Shape, moistness and slight crisp on the outside were just right!
Great to hear, Mary! Thanks so much for writing and sharing this 🙂